

How to Embed an Excel File in PowerPoint (5 Easy Ways)
Here’s an overview of how data will be presented from Excel into PowerPoint.
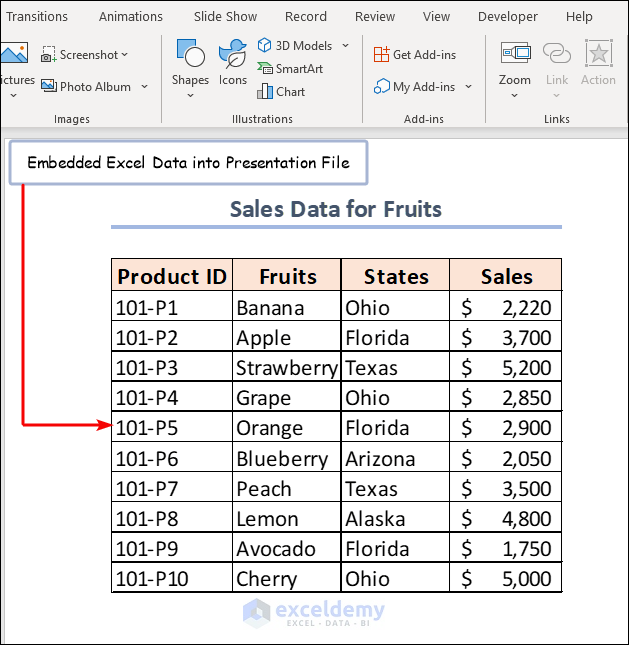
How to Embed an Excel File in PowerPoint: 5 Suitable Examples
Let’s assume we have a “ Sales Data for Fruits ” dataset, which includes the Product ID , Fruits , States , and Sales amount under columns B , C , D , and E respectively.

Method 1 – Embedding an Entire Excel File in PowerPoint
- Select the Insert tab on the Ribbon in PowerPoint.
- Click on the Object command on the Text group of commands.
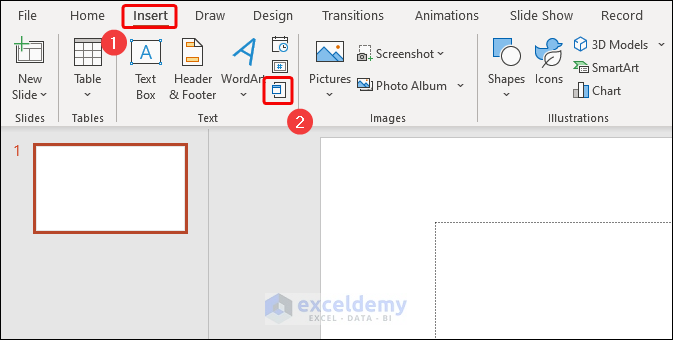
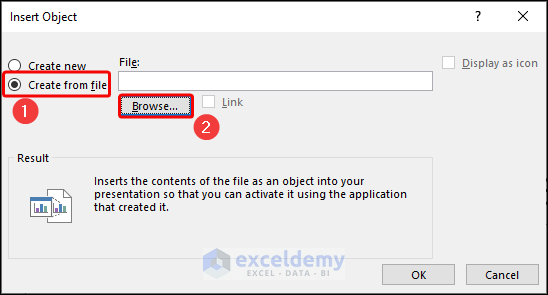
- In the Insert Object dialog box, click on the radio button of Create from file option.
- Choose the Browse… button.
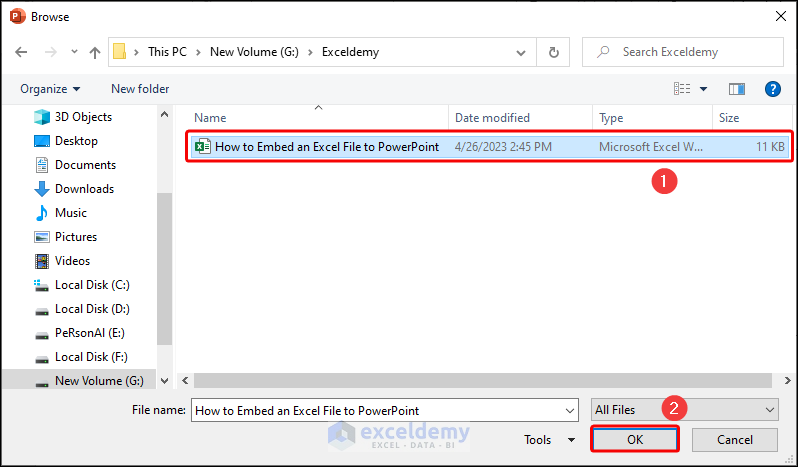
- In the Browse window, select your desired file and click OK .
- You can see your file path and name in the highlighted box. Click OK .
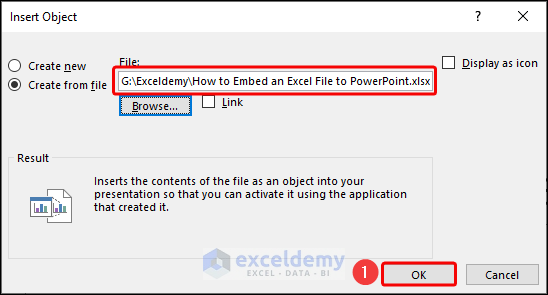
Note: Don’t check the box before the Link option to embed the Excel file .
Make sure to attach your intended data on the first page of the Excel file.
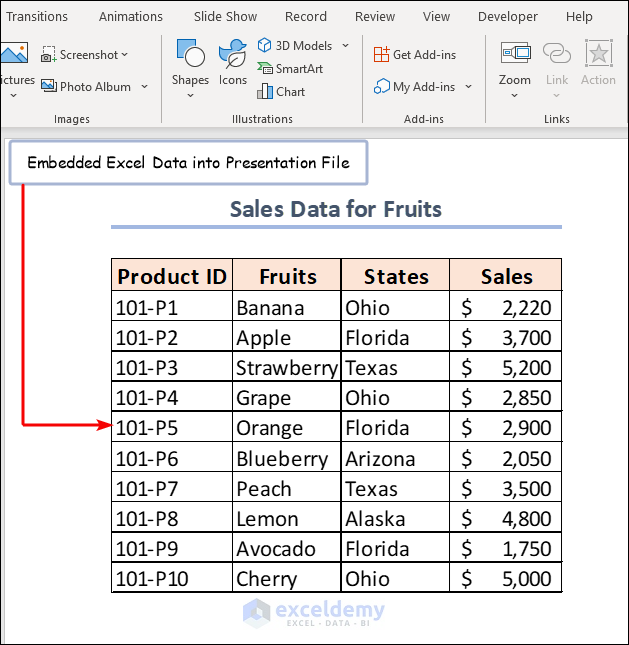
Read More: How to Perform Excel to PowerPoint Automation
Method 2 – Embedding a Section of Excel Data in PowerPoint File
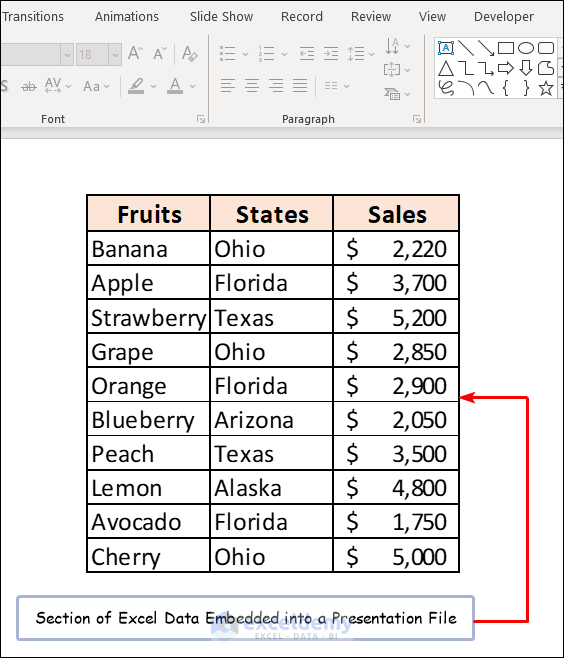
- Open the Excel file and select the range of data (e.g. C4:E14 ) you want to embed.
- Press CTRL + C on your keyboard to copy this range.
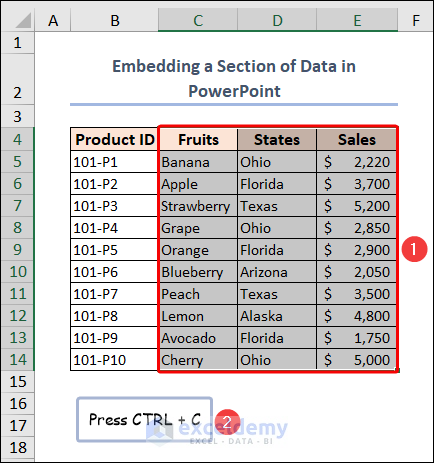
- Open your PowerPoint slide and navigate to the Home tab.
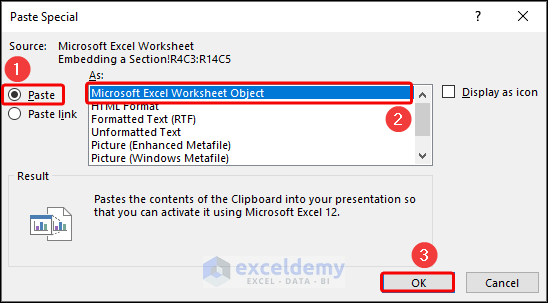
- Click on the Paste drop-down option and then click on Paste Special .
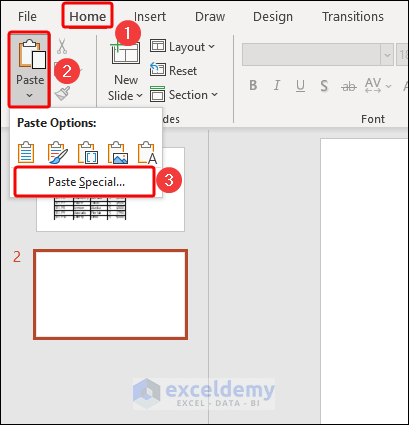
- Select Paste and click on Microsoft Excel Worksheet Object . Press OK .
- The selected range is copied to the presentation file.
Method 3 – Utilizing Embed Command to Add Unlinked Excel File
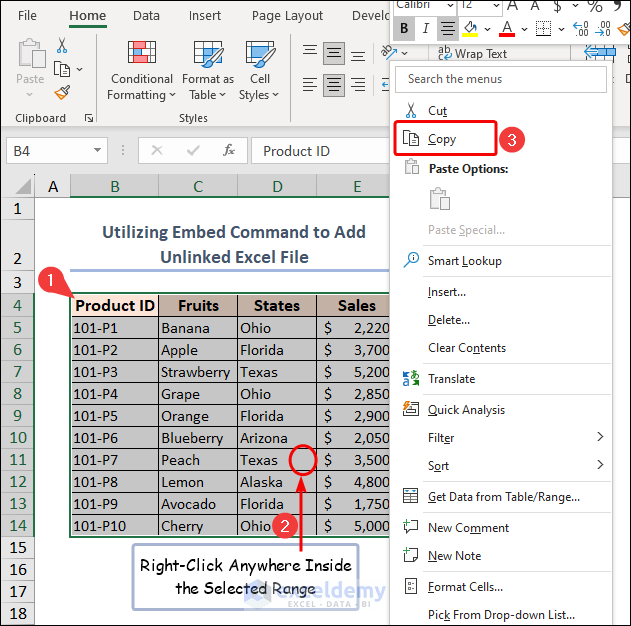
- Select the dataset (e.g. B4:E14 ) and right-click.
- Click on the Copy command from the context menu.
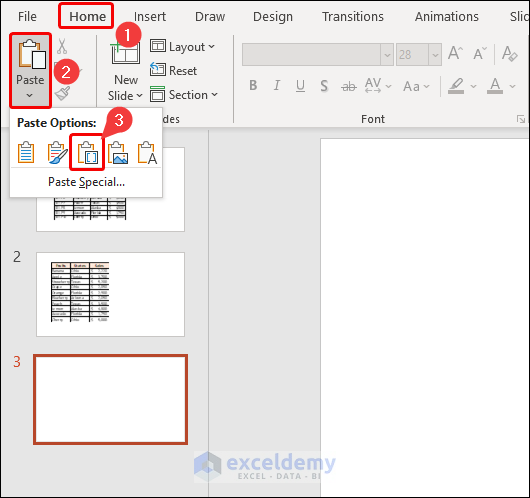
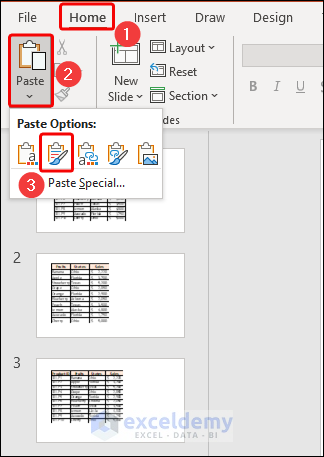
- Use the Paste drop-down option in PowerPoint.
- Choose Embed (E) from Paste Options .
- The output in PowerPoint is as follows.
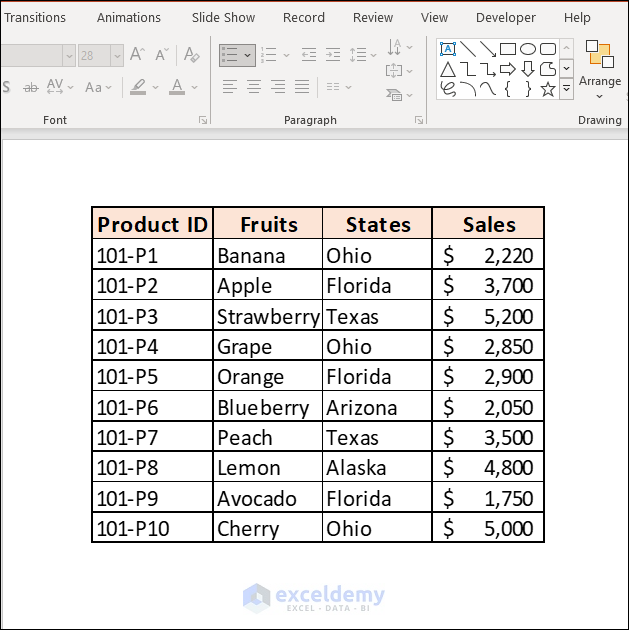
Method 4 – Applying Camera Gadget Tool to Embed Data as Image
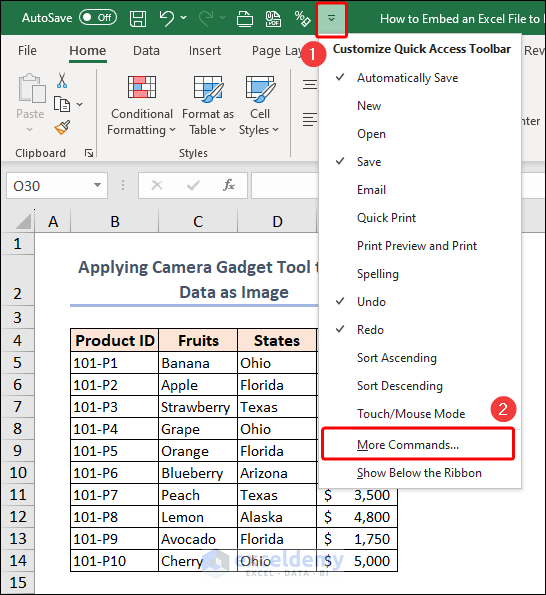
- Click on the triangular-shaped Customize Quick Access Toolbar icon and select More Commands .
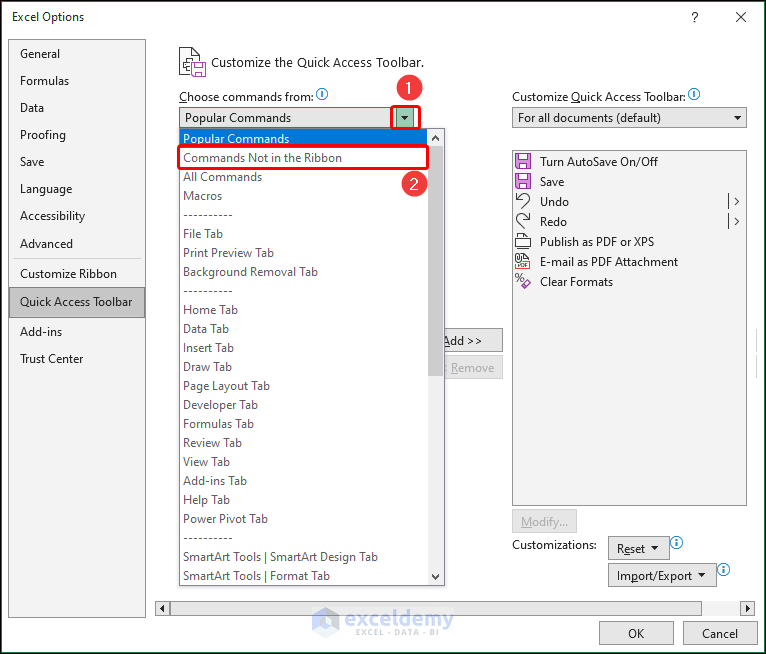
- This will bring a dialog box as follows. Click on the drop-down icon beside the Popular Command bar to get more options. Then pick Commands Not in the Ribbon from the available options.
- To bring the Camera tool to the right side, select Camera and click the Add button in the middle.
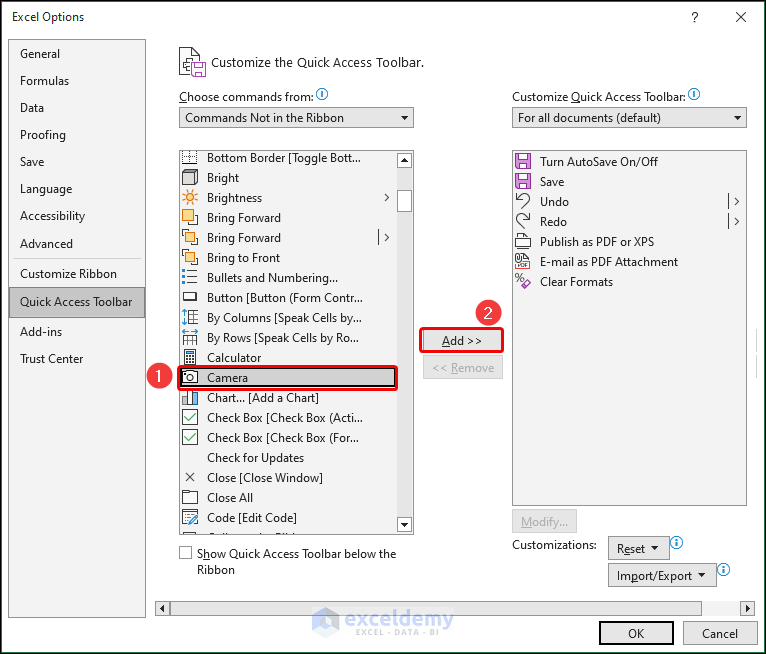
- This will allow you to have a Camera icon in the Toolbar . Now you’re ready to take snaps of the selected area by using the Camera tool.
- Select the region you want to copy and press the Camera icon.
- Left click anywhere to get an image.
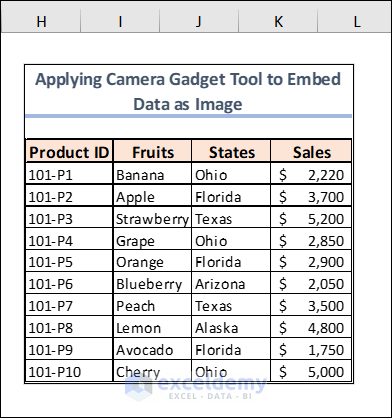
- Copy the image by selecting it and pressing Ctrl + C command.
- Paste the output in the presentation slide as follows:
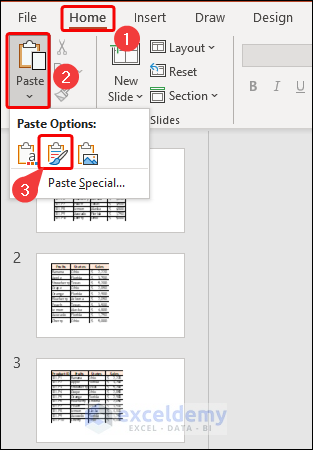
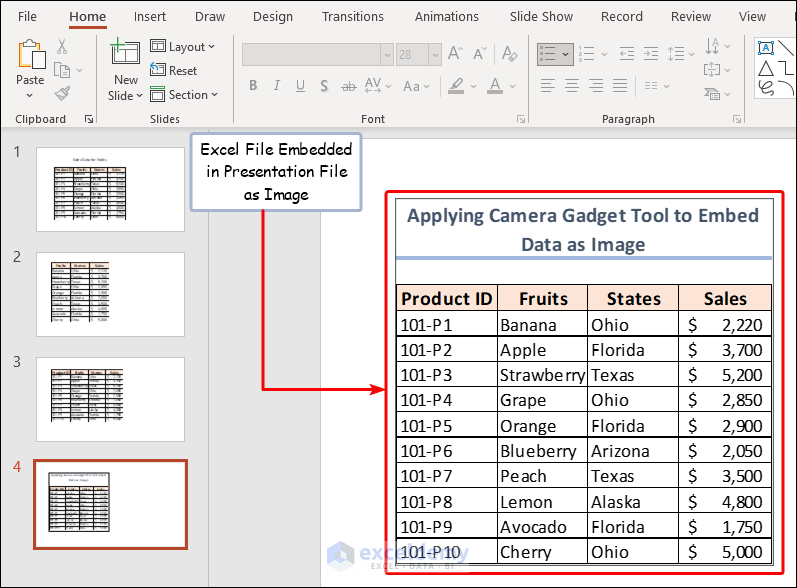
- Remember that the embedded portion is an image.
Read More: How to Link Excel Data to PowerPoint Chart
Method 5 – Embedding an Excel Chart in PowerPoint File
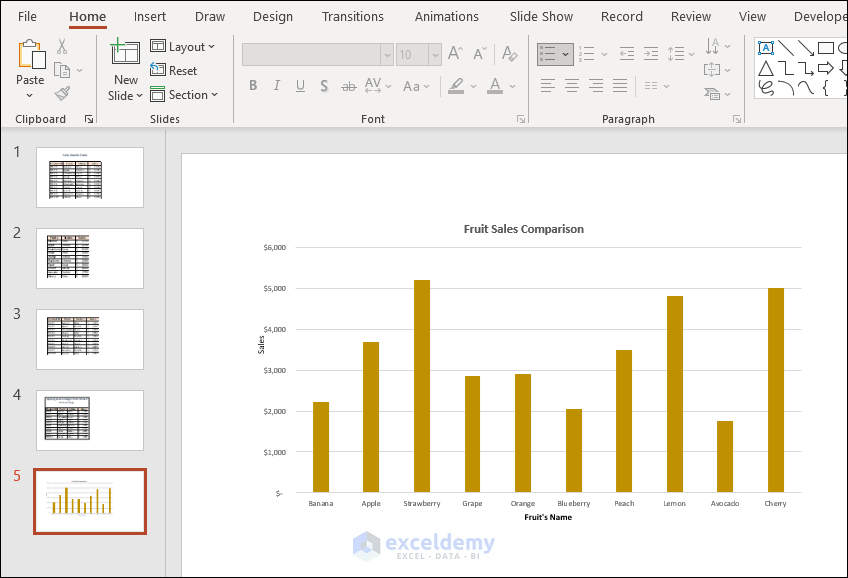
Charts are perhaps the most commonly-used Excel format in PowerPoint.
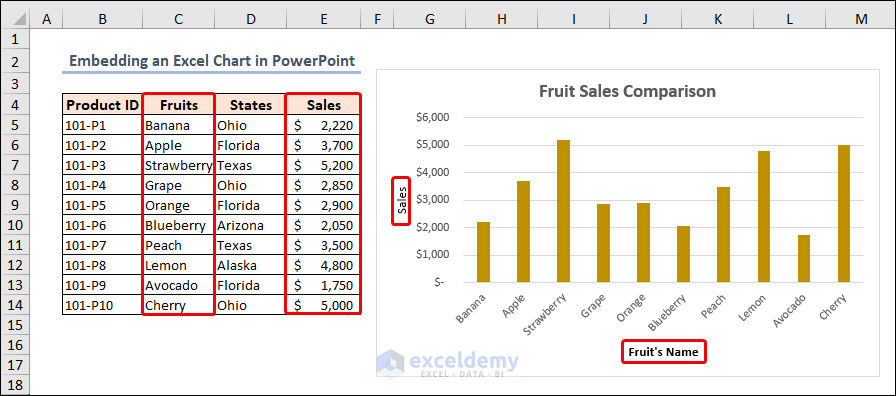
- Copy the Excel chart with Ctrl+ C command.
- Paste the chart into the PowerPoint slide by using Keep Source Formatting & Embed Workbook , one of the Paste Options .
Finally, the output in the presentation slide is as follows:
Embed Vs. Link an Excel File in PowerPoint
When you want to add an Excel file to a PowerPoint presentation, you have two options: embedding or linking the file. Here’s a brief overview of the differences between the two:
- Embedding an Excel file in PowerPoint means that a copy of the file is saved within the PowerPoint presentation itself. This can make your presentation larger in file size, but it also means that you don’t need the original Excel file to view or present the data. Any changes made to the original Excel file won’t be reflected in the embedded copy within PowerPoint.
- Linking an Excel file to PowerPoint means that the presentation will display data from the original Excel file. This keeps the file size of the presentation smaller and ensures that any changes made to the Excel file are reflected in the PowerPoint presentation. However, if the Excel file is moved or deleted, the links will be broken and the data won’t display correctly in the presentation.
Read More: How to Link Excel Sheets to PowerPoint
How to Insert Excel File into PowerPoint as Icon
- Open a presentation file and select the intended slide to place the icon.
- Go to the Insert tab and click on the Object tool in the Text group.
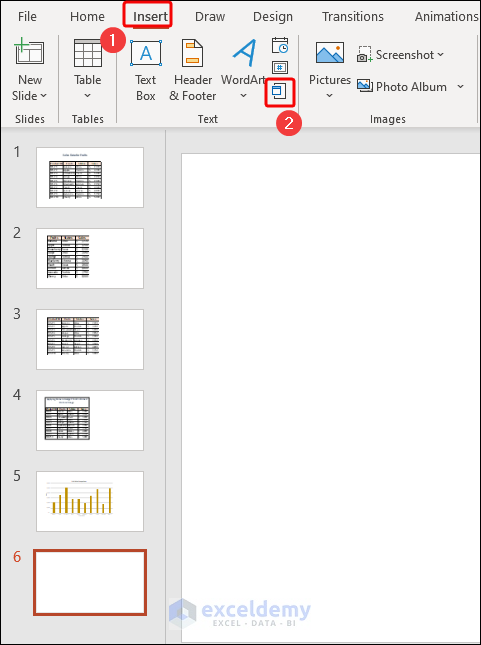
- Select the Create from file option.
- Click on the Browse button to attach the Excel file that you want to place as an icon on the slide.
- Make sure to check the boxes beside Link and Display as icon options.
- Use the hooks on the icon’s corners to resize it and drag it into place on the slide.
- Double-click the icon to access the workbook’s contents and edit them.
Read More: How to Insert an Excel File into PowerPoint as an Icon
How to Link Excel File in PowerPoint That Updates Data Dynamically
- To link an Excel file in PowerPoint, do the same things as you did in Example 1 .
- You have to mark the box before the Link option.
- Press the OK button.
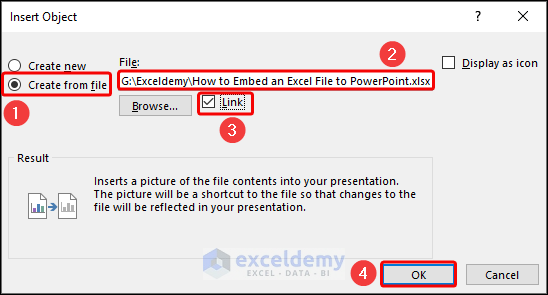
Now, if you make any changes in the Excel file, you’ll get the updated data in PowerPoint.
Note: If you delete the file or change the location of the file, PowerPoint will start throwing errors when trying to display data.
Read More: How to Link Powerpoint to Excel for Dynamic Data Updates
Benefits and Drawbacks of Embedding an Excel File in PowerPoint
When creating presentations, it’s useful to embed the Excel file directly into the PowerPoint file. But, it’s important to consider the benefits and drawbacks of this approach.
- Easy Access to Data: Embedding an Excel file in PowerPoint allows you to easily access and manipulate data without having to switch between programs.
- Increased Interactivity: Embedding an Excel file in PowerPoint allows you to create more interactive presentations with live data that can be manipulated and updated in real time.
- Saves Time: It can save time by eliminating the need to create separate charts and graphs from scratch.
- Better Organization: Embedding an Excel file in PowerPoint allows you to keep all your data in one place, making it easier to organize and manage your presentation.
- Consistent Formatting: Embedding ensures that your data will be presented with consistent formatting and style.
- File Size: Embedding an Excel file in PowerPoint can increase the file size of your presentation, making it more difficult to share and collaborate with others.
- Compatibility Issues: Embedding an Excel file in PowerPoint can lead to compatibility issues between different versions of PowerPoint and Excel.
- Security Risks: Embedding an Excel file in PowerPoint can pose security risks if the Excel file contains sensitive information.
- Limited Editing Capabilities: Embedding an Excel file in PowerPoint limits your editing capabilities, as you may not be able to make changes to the data directly within the PowerPoint slide.
- Refreshing Data: If the data in the embedded Excel file changes, you will need to manually refresh the data in the PowerPoint slide to ensure accuracy.
Things to Remember
- Keep file size in mind when you embed an Excel file in PowerPoint.
- Ensure compatibility with different versions of PowerPoint and Excel.
- Test your presentation to ensure that the embedded Excel file displays correctly.
- Update the presentation file with an embedded Excel file if the data changes or needs to be refreshed.
- Consider security and privacy concerns when embedding Excel files containing sensitive information.
Frequently Asked Questions
1. Will embedding an Excel file in PowerPoint increase the file size of my presentation?
Yes, it can increase, especially if the Excel file contains a lot of data. This can make it more difficult to share and collaborate on the presentation.
2. How do I ensure compatibility between different versions of PowerPoint and Excel when embedding a file?
To ensure compatibility, it’s important to save the Excel file in a format that is compatible with the version of PowerPoint you are using.
3. What security risks should I be aware of when embedding an Excel file in PowerPoint?
It’s important to ensure that any sensitive information within the embedded Excel file is appropriately protected and access is limited to authorized individuals.
Practice Section
We have provided a practice section on the right side of each sheet so you can practice yourself. Please make sure to do it yourself.
Download Practice Files
Download the following practice workbook and presentation file. It will help you to realize the topic more clearly and will help you practice yourself.
Related Articles
- [Fixed!] Problems with Embedded Excel Files in PowerPoint
- [Solved] Embedded Excel in PowerPoint Not Showing All Data
- How to Open Existing PowerPoint File from Excel VBA
<< Go Back to Excel to PowerPoint | Export Data from Excel | Learn Excel
What is ExcelDemy?
Tags: Excel to PowerPoint

Mohammad Shah Miran has a professional background spanning over a year at Softeko. Initially starting as an Excel and VBA writer, he authored more than 50 articles for the ExcelDemy project. Currently, Miran is engaged in the LinuxSimply project as a Linux content developer, completed over 40 articles. His analytical approach extends across various domains, including Excel, VBA, Bash scripting, Linux, data analysis, and Python programming. In his leisure time, Miran enjoys watching movies and series or listening... Read Full Bio
Leave a reply Cancel reply
ExcelDemy is a place where you can learn Excel, and get solutions to your Excel & Excel VBA-related problems, Data Analysis with Excel, etc. We provide tips, how to guide, provide online training, and also provide Excel solutions to your business problems.
See Our Reviews at

- User Reviews
- List of Services
- Service Pricing
- Create Basic Excel Pivot Tables
- Excel Formulas and Functions
- Excel Charts and SmartArt Graphics
- Advanced Excel Training
- Data Analysis Excel for Beginners

Advanced Excel Exercises with Solutions PDF

How-To Geek
How to link or embed an excel worksheet in a powerpoint presentation.

Your changes have been saved
Email is sent
Email has already been sent
Please verify your email address.
You’ve reached your account maximum for followed topics.
Quick Links
What's the difference between linking and embedding, how to link or embed an excel worksheet in microsoft powerpoint.
Sometimes, you want to include the data on an Excel spreadsheet in a Microsoft PowerPoint presentation. There are a couple of ways to do this, depending on whether or not you want to maintain a connection with the source Excel sheet. Let's take a look.
You actually have three options for including a spreadsheet in a PowerPoint presentation. The first is by simply copying that data from the spreadsheet, and then pasting it into the target document. This works okay, but all it really does is convert the data to a simple table in PowerPoint. You can use PowerPoint's basic table formatting tools on it, but you can't use any of Excel's features after the conversion.
While that can be useful sometimes, your other two options---linking and embedding---are much more powerful, and are what we're going to show you how to do in this article. Both are pretty similar, in that you end up inserting an actual Excel spreadsheet in your target presentation. It will look like an Excel sheet, and you can use Excel's tools to manipulate it. The difference comes in how these two options treat their connection to that original Excel spreadsheet:
- If you link an Excel worksheet in a presentation, the target presentation and the original Excel sheet maintain a connection. If you update the Excel file, those updates get automatically reflected in the target presentation.
- If you embed an Excel worksheet in a presentation, that connection is broken. Updating the original Excel sheet does not automatically update the data in the target presentation.
There are advantages to both methods, of course. One advantage of linking a document (other than maintaining the connection) is that it keeps your PowerPoint presentation's file size down, because the data is mostly still stored in the Excel sheet and only displayed in PowerPoint. One disadvantage is that the original spreadsheet file needs to stay in the same location. If it doesn't, you'll have to link it again. And since it relies on the link to the original spreadsheet, it's not so useful if you need to distribute the presentation to people who don't have access to that location.
Embedding that data, on the other hand, increases the size of presentation, because all that Excel data is actually embedded into the PowerPoint file. There are some distinct advantages to embedding, though. For example, if you're distributing that presentation to people who might not have access to the original Excel sheet, or if the presentation needs to show that Excel sheet at a specific point in time (rather than getting updated), embedding (and breaking the connection to the original sheet) makes more sense.
So, with all that in mind, let's take a look at how to link and embed an Excel Sheet in Microsoft PowerPoint.
Linking or embedding an Excel worksheet into a PowerPoint presentation is actually pretty straightforward, and the process for doing either is almost identical. Start by opening both the Excel worksheet and the PowerPoint presentation you want to edit at the same time.
In Excel, select the cells you want to link or embed. If you would like to link or embed the entire worksheet, click on the box at the juncture of the rows and columns in the top left-hand corner to select the whole sheet.
Copy those cells by pressing CTRL+C in Windows or Command+C in macOS. You can also right-click any selected cell, and then choose the "Copy" option on the context menu.
Now, switch to your PowerPoint presentation and click to place the insertion point where you would like the linked or embedded material to go. On Home tab of the Ribbon, click the down arrow beneath the "Paste" button, and then choose the "Paste Special" command from the dropdown menu.
This opens the Paste Special window. And it's here where you'll find the only functional different in the processes of linking or embedding a file.
If you want to embed your spreadsheet, choose the "Paste" option over on the left. If you want to link your spreadsheet, choose the "Paste Link" option instead. Seriously, that's it. This process is otherwise identical.
Whichever option you choose, you'll next select the "Microsoft Excel Worksheet Object" in the box to the right, and then click the "OK" button.
And you'll see your Excel sheet (or the cells you selected) in your PowerPoint presentation.
If you linked the Excel data, you can't edit it directly in PowerPoint, but you can double-click anywhere on it to open the original spreadsheet file. And any updates you make to that original spreadsheet are then reflected in your PowerPoint presentation.
If you embedded the Excel data, you can edit it directly in PowerPoint. Double-click anywhere in the spreadsheet and you'll stay in the same PowerPoint window, but the PowerPoint Ribbon gets replaced by the Excel Ribbon and you can access all the Excel functionality. It's kind of cool.
And when you want to stop editing the spreadsheet and go back to your PowerPoint controls, just click anywhere outside the spreadsheet.
- Microsoft Office
- Microsoft Excel

How to Embed an Excel File in PowerPoint: Quick & Easy!
Trish Dixon
Embedding an Excel file in PowerPoint can make your presentation more dynamic by including data directly from your spreadsheet. Whether you need to showcase charts, tables, or raw data, embedding Excel allows you to maintain the connection between your presentation and the original Excel data.
In this article, we will guide you step-by-step through the process of embedding an Excel spreadsheet into a PowerPoint slide, ensuring your data remains up-to-date and easily editable.
Why Embed Excel Files in PowerPoint?
Embedding Excel files in PowerPoint offers numerous advantages. By embedding your Excel worksheet directly into PowerPoint, you can ensure that your data remains interactive, with all formulas and calculations intact. Additionally, when you update your Excel data , these changes can reflect in your PowerPoint presentation, making it more efficient for presentations that require real-time data updates.
Here are the key benefits of embedding an Excel file into PowerPoint:
- Data Accuracy : You avoid errors from manual data entry.
- Dynamic Updates : Any change in the original Excel sheet automatically updates the embedded file in PowerPoint.
- Ease of Access : Presenters can showcase charts, graphs, and tables directly within the presentation.
- Professional Appeal : It presents clean, interactive data without switching between applications.
Steps to Embed an Excel File in PowerPoint
Step 1: open your powerpoint presentation.
Begin by opening the PowerPoint presentation where you want to embed the Excel file . You can create a new slide or select an existing slide where the embedded Excel file will be placed.
- Open PowerPoint .
- Navigate to the slide where you want the Excel file to appear.
- Click on the desired slide to start the embedding process.
Step 2: Insert the Excel File
Once your PowerPoint slide is open, you’ll need to insert the Excel file into your presentation. PowerPoint provides two primary methods for embedding an Excel file : linking the file and embedding it as an object.
Method 1: Embed as a Static Object
Embedding an Excel file as an object allows you to embed the entire spreadsheet directly into PowerPoint. The data becomes part of the PowerPoint file, meaning no external link is maintained, and the data does not update when the original file is changed.
- Go to the Insert tab in the PowerPoint ribbon.
- Click on Object .
- In the dialog box, select Create from File .
- Click on Browse and navigate to the Excel file you wish to embed.
- Select the file and click OK .
The embedded Excel file will now appear as an object on your slide. You can resize and move it as needed.
Method 2: Link to the Excel File
Linking the Excel file allows you to maintain a connection between the PowerPoint slide and the original Excel spreadsheet. Any updates made to the Excel worksheet will reflect in your PowerPoint presentation.
- Go to the Insert tab.
- Click Object .
- In the dialog box, check the Link box.
- Click Browse and choose the Excel file to link.
- Click OK to embed the linked Excel file.
Now, your PowerPoint slide is linked to the Excel file. Whenever the Excel file is updated, these changes will automatically appear in the embedded object.
Step 3: Edit the Embedded Excel File
Once the Excel file is embedded, you can edit the data directly from PowerPoint without needing to open Excel separately. Here’s how to do it:
- Double-click on the embedded Excel object .
- The embedded file will open within PowerPoint, allowing you to make changes.
- After editing, click outside the embedded object to return to PowerPoint.
This method is especially useful when you want to make small adjustments to the data during a presentation.
Step 4: Display Specific Data from Excel
Sometimes, you don’t need to embed the entire Excel worksheet . Instead, you might want to show only a specific chart or table. Here’s how you can do that:
- In Excel , select the data or chart you want to embed.
- Press Ctrl + C to copy the selection.
- Switch back to PowerPoint and navigate to the slide where you want to place the data.
- Go to the Home tab and click on Paste Special under the Paste dropdown.
- Select Microsoft Excel Worksheet Object to embed the selected data as an object.
This process embeds only the selected data, giving you control over what appears on your slide.
Using Excel Charts in PowerPoint
A significant advantage of embedding Excel files in PowerPoint is that you can display Excel charts directly within your presentation. This maintains the integrity of your data while allowing you to present it visually.
Step 1: Create a Chart in Excel
To begin, create your chart in Excel. This could be a bar chart, line graph, or pie chart, depending on your data.
- Open your Excel file .
- Select the data you want to visualize.
- Click on the Insert tab and select your desired chart type.
- Once your chart is ready, select it and copy it using Ctrl + C .
Step 2: Paste the Chart in PowerPoint
Now that you have your chart ready in Excel , you can paste it into PowerPoint.
- Open your PowerPoint presentation.
- Navigate to the slide where you want to place the chart.
- Paste the chart using Ctrl + V .
You can choose to link the chart to Excel, meaning any changes made in the Excel file will update the chart in PowerPoint .
Step 3: Format the Chart in PowerPoint
After pasting the chart into PowerPoint, you can format it to fit the overall design of your presentation. Use the Chart Tools in PowerPoint to adjust the colors, fonts, and other visual elements of your chart.

Best Practices for Embedding Excel Files in PowerPoint
Here are a few best practices to keep in mind when embedding Excel files into your PowerPoint slides :
- File Size Considerations : Embedding large Excel files can significantly increase the size of your PowerPoint presentation. If possible, try embedding only the specific data or chart you need rather than the entire workbook.
- Update Links : If you choose to link your Excel file to PowerPoint, ensure the Excel file remains in its original location. Moving the Excel file could break the link, resulting in errors during your presentation.
- Maintain Formatting : When embedding Excel data, take care to maintain formatting consistency. PowerPoint may alter some of the Excel formatting, so double-check before presenting.
Troubleshooting Common Issues
Problem 1: excel object not displaying correctly.
Sometimes, the embedded Excel object might not display correctly in PowerPoint. This can happen due to compatibility issues between Excel and PowerPoint. To fix this, try embedding the Excel file as an image instead of an editable object.
- Copy the Excel table or chart.
- Go to PowerPoint and paste it as an image by selecting Paste Special and choosing Picture .
Problem 2: Linked Excel File Not Updating
If the linked Excel file is not updating in PowerPoint, ensure the Excel file is still in the same location it was originally linked from. If the file has been moved or renamed, PowerPoint will not be able to update the data.
Problem 3: PowerPoint File Size Too Large
Embedding large Excel files can inflate the size of your PowerPoint presentation. To reduce file size, consider embedding only specific parts of the Excel worksheet or using a linked file instead of embedding the entire workbook.
Final Thoughts
Embedding an Excel file in PowerPoint is a powerful way to integrate dynamic data into your presentations. Whether you’re showcasing detailed financial reports, displaying interactive charts, or embedding raw data, using Excel files within PowerPoint can make your presentation more professional and efficient. By following the steps outlined above, you can easily embed Excel worksheets , charts, or data tables in your PowerPoint slides, ensuring a seamless integration between the two Microsoft applications.
How do I embed an Excel file into PowerPoint?
To embed an Excel file into PowerPoint, go to the Insert tab, select Object, and choose Create from File. Browse and select your Excel file, then click OK.
Can I link an Excel file to PowerPoint for automatic updates?
Yes, you can link an Excel file to PowerPoint by checking the Link box when embedding the file. Any updates made to the Excel file will reflect in PowerPoint.
How do I edit the embedded Excel file in PowerPoint?
Double-click the embedded Excel object in PowerPoint. This will open the Excel file within PowerPoint, allowing you to edit it directly.
Why is my linked Excel file not updating in PowerPoint?
If your linked Excel file is not updating, ensure that the file remains in its original location. Moving or renaming the file may break the link, preventing updates.
Can I embed only a part of an Excel file, like a chart, into PowerPoint?
Yes, you can embed specific parts of an Excel file, such as a chart or table, by selecting and copying it from Excel, then pasting it into PowerPoint.
Will embedding an Excel file increase my PowerPoint file size?
Yes, embedding an entire Excel file can increase your PowerPoint file size. Consider embedding only the necessary data or using a linked file to reduce size.
- Recent Posts
- How to Export an Excel Pivot Chart to PowerPoint? – November 7, 2024
- How to Build an Org Chart in PowerPoint: Expert Guide – November 6, 2024
- 11 Easy Ways to Fix “Sorry, PowerPoint Can’t Read” Error – November 4, 2024
Leave a Reply Cancel reply
Your email address will not be published. Required fields are marked *
Save my name, email, and website in this browser for the next time I comment.
Latest Posts
How to export an excel pivot chart to powerpoint.
Learn the best methods to export Excel pivot charts to PowerPoint. Choose from images, embedded objects, or links for automatic updates.
How to Build an Org Chart in PowerPoint: Expert Guide
Create a professional org chart in PowerPoint with ease. Step-by-step guide on designing, customizing, and organizing your company’s structure visually.
11 Easy Ways to Fix “Sorry, PowerPoint Can’t Read” Error
Learn how to fix the “Sorry, PowerPoint can’t read” error with effective troubleshooting tips and solutions. Access your presentations seamlessly.
How to Add Excel Link in PPT: A Step-by-Step Guide to Integration
Adding an Excel link in a PowerPoint presentation can be a game-changer for your data-heavy slides. By embedding or linking an Excel worksheet, your presentation becomes more dynamic and interactive. Here’s a step-by-step guide to help you seamlessly integrate Excel data into your PowerPoint slides.
Step-by-Step Tutorial to Add Excel Link in PPT
In this guide, we will walk you through the process of linking an Excel spreadsheet to a PowerPoint slide. This will ensure that your data is always up-to-date and interactive.
Step 1: Open Both Excel and PowerPoint
First, open the Excel file containing the data you want to link, and the PowerPoint presentation where you want to add the link.
By having both programs open, you’ll be able to switch between them easily and complete the linking process without any hassle.
Step 2: Select the Data in Excel
Next, highlight the specific data or chart in Excel that you want to link to your PowerPoint slide.
Making sure you’ve selected the correct data is crucial because this is what will appear in your presentation.
Step 3: Copy the Data
Right-click on the selected data in Excel and choose "Copy," or press Ctrl+C on your keyboard.
Copying the data prepares it for linking, which is a vital step to ensure the data can be pasted into PowerPoint.
Step 4: Go to Your PowerPoint Slide
Switch to PowerPoint and navigate to the slide where you want to place the Excel data.
Choosing the right slide for your data is essential for maintaining the flow and coherence of your presentation.
Step 5: Use Paste Special
In PowerPoint, go to the Home tab, click the down arrow under the Paste button, and choose "Paste Special."
Selecting "Paste Special" will give you different options to paste your data, including linking it.
Step 6: Select "Paste Link"
From the Paste Special dialog box, choose "Paste Link" and select the appropriate format, such as a Microsoft Excel Worksheet Object.
This step ensures that the data in your PowerPoint slide will update automatically when changes are made in the Excel file.
Once you complete these steps, the linked Excel data will appear in your PowerPoint slide. When you update the data in Excel, the changes will automatically reflect in your presentation.
Tips for Adding Excel Link in PPT
- Keep your files saved in the same location : This prevents broken links.
- Use descriptive names for your data ranges : This makes it easier to identify linked data.
- Check compatibility : Ensure your versions of Excel and PowerPoint are compatible.
- Regularly update both files : Keep both files up-to-date to avoid mismatch errors.
- Practice the process : Familiarize yourself with these steps before your actual presentation.
Frequently Asked Questions
How do i unlink the excel file from powerpoint.
You can unlink by right-clicking the linked data in PowerPoint and selecting "Break Link."
Will the link work if I email the presentation?
Yes, but you must include both the Excel and PowerPoint files in the email.
Can I link multiple Excel files to one PowerPoint?
Absolutely, you can link data from multiple Excel files to different slides in one PowerPoint presentation.
What happens if the Excel file gets moved?
If the Excel file is moved, the link will break. You’ll need to re-link the data in PowerPoint.
Is the linking method the same for Mac and Windows?
Yes, the steps are similar, but the interface may look slightly different.
- Open both Excel and PowerPoint.
- Select the data in Excel.
- Copy the data.
- Go to your PowerPoint slide.
- Use Paste Special.
- Select "Paste Link".
Integrating Excel data into your PowerPoint presentation can transform your slides by making them more dynamic and data-rich. By following these steps, you ensure that your data is always current and relevant. Whether it’s for a business meeting, academic presentation, or any other professional setting, linking Excel data to PowerPoint is a valuable skill to have.
For further reading, consider diving into advanced features of Microsoft Office like embedding other types of files or exploring different data visualization tools that can complement your presentations. Keep practicing, and soon, adding an Excel link in your PowerPoint will be second nature. Happy presenting!

Matt Jacobs has been working as an IT consultant for small businesses since receiving his Master’s degree in 2003. While he still does some consulting work, his primary focus now is on creating technology support content for SupportYourTech.com.
His work can be found on many websites and focuses on topics such as Microsoft Office, Apple devices, Android devices, Photoshop, and more.
Share this:
- Click to share on Twitter (Opens in new window)
- Click to share on Facebook (Opens in new window)
Related Posts
- How to Rotate a Powerpoint Slide Presentation
- How to Import Slides from Another Google Slides Presentation: A Step-by-Step Guide
- How to Download a Google Slides Presentation as a Powerpoint File
- How to Do a Powerpoint Google Slides Presentation Conversion
- How to Make Google Slides Vertical (5 Quick Steps)
- How to Add a New Slide in Google Slides: A Step-by-Step Guide
- How to Add a Hyperlink on Google Slides
- How to Delete a Slide in Powerpoint 2010: Step-by-Step Guide
- How to Delete Multiple Slides in Google Slides: A Step-by-Step Guide
- How to Link Excel Sheet in PPT: A Step-by-Step Guide to Seamless Integration
- How to Hide a Slide in Powerpoint 2010: A Step-by-Step Guide
- How to Make a Powerpoint Slide Vertical in Powerpoint 2013: A Step-by-Step Guide
- How to Convert Powerpoint to Google Slides: A Tech Solution
- How to Duplicate a Slide in Powerpoint: A Step-by-Step Guide
- How to Insert Slides from Another Presentation: Powerpoint 2024 Guide
- How to Merge Files in Powerpoint: A Step-by-Step Guide
- How to Remove Slide Numbers in Powerpoint 2019: Easy Steps
- How to Link Excel to PowerPoint: A Step-by-Step Guide for Professionals
- How to End Powerpoint on Last Slide in Powerpoint 2010: A Step-by-Step Guide
- How to Duplicate a Slide in Powerpoint Online: A Step-by-Step Guide
Get Our Free Newsletter
How-to guides and tech deals
You may opt out at any time. Read our Privacy Policy

IMAGES
VIDEO
COMMENTS
When you want to add an Excel file to a PowerPoint presentation, you have two options: embedding or linking the file. Here’s a brief overview of the differences between the two: Embedding an Excel file in PowerPoint means that a copy of the file is saved within the PowerPoint presentation itself.
Link an entire Excel worksheet to PowerPoint. In PowerPoint, on the Insert tab, click or tap Object. In the Insert Object dialog box, select Create from file. Click or tap Browse, and in the Browse box, find the Excel workbook with the data you want to insert and link to.
Sometimes, you want to include the data on an Excel spreadsheet in a Microsoft PowerPoint presentation. There are a couple of ways to do this, depending on whether or not you want to maintain a connection with the source Excel sheet. Let's take a look.
Embedding an Excel file in PowerPoint can make your presentation more dynamic by including data directly from your spreadsheet. Whether you need to showcase charts, tables, or raw data, embedding Excel allows you to maintain the connection between your presentation and the original Excel data.
Adding an Excel link in a PowerPoint presentation can be a game-changer for your data-heavy slides. By embedding or linking an Excel worksheet, your presentation becomes more dynamic and interactive. Here’s a step-by-step guide to help you seamlessly integrate Excel data into your PowerPoint slides.
Linking creates a dynamic connection between your PowerPoint presentation and the original Excel file. Any changes to the Excel file are instantly reflected in the linked PowerPoint slide, ensuring real-time synchronization to display the latest data.