Making the most of Moodle’s Assignments for formative and summative assessment
Moodle’s assignment activities are easy to set up and offer many possibilities to create unique learning experiences for your students.
The Assignment activity in Moodle allows students to submit work for their teachers to grade or assess. The learners’ submissions may be text typed online or uploaded files of any format that the teachers specify. While creating an Assignment is quite straightforward, this activity has several settings that educators can combine to create unique experiences for their learners.

Moodle Assignment for formative and summative assessment
Because it has so many combinations of configuration, the Assignment activity can be used both for formative assessment and summative evaluation. The table below outlines the goals and characteristics of each type of assessment:

In formative assessment the goal is to monitor student learning therefore the assignments should be set to be always available, without necessarily being graded, allowing additional attempts, with no pass grade required (if it is graded). The activity completion is usually set to “view” or “submit”. An formative assignment such as this often gets a 0% weight in the gradebook.
In summative assessment, the goal is to evaluate student learning via assessment, thus a summative assignment is usually set up with clear start, end and cut-off dates. It will be graded, with additional attempts to re-open the assessment set manually. Summative assessments are usually set with a required pass grade and the activity completion linked to requiring a “grade”. Summative assignments often have a weight higher than 20% in the gradebook.
Moodle Assignment submissions
There are many ways to combine submission types and settings in Assignment activity to achieve your teaching and learning goals or simply streamline your class management:
Assignments with no submission required These are assignments where learners don’t have to submit anything to complete the assessment. While this may sound counterintuitive, this type of Assignment can be used, for instance, for offline assessment -use it as an attendance sheet on a field trip- or for example, to assess a face-to-face speaking Assignment where learners really don’t have anything to submit.
Assignments with online text submission With this type of Assignment submissions, learners add their work directly into the Assignment activity using the Atto editor, a rich text editor that allows learners to write text, add images and even record audio or video files. For this and for all other submission types, you can enable an option to allow learners to work in draft versions of their Assignment before sending the final submission.
Assignments with file submission This type of submission for Assignments requires learners to submit a file -teachers can define its format and size- for teachers to evaluate. To streamline the grading process, teachers can download all submissions at once, including a grading worksheet that displays the user name, email and submission status and allows teachers to add a grade and feedback in comments – and then bulk-upload all assessments back to Moodle, including a separate feedback file for each submission.
Group assignments in Moodle Collaborative learning is at the heart of Moodle LMS, so Moodle Assignments can easily be set up to be submitted as a group. Teachers can set these Assignments up so that only one of the group members has to submit the file, or make it mandatory for each team member to make the submission. Favourite tip: Our Moodle Academy team recommends combining this type of Assignment with a peer evaluation to know how the experience was for each of the group members.
Grading Moodle Assignments
Moodle Assignments support two main types of grading: simple direct grading and advanced grading. The first group includes grading done through numerical scales, custom scales (for example, stars or words like weak , satisfactory , strong , etc) or no grading at all. Advanced grading methods in Moodle include rubrics and marking guides, and we’ll look at them in more detail:
Moodle Assignment: assessment with marking guides In this type of grading, the teacher defines a series of criteria and assigns a maximum amount of marking points to each. When assessing learners’ assignments, the teachers provide both a numerical mark and a comment for each of the criteria. For this type of grading, you can make the criteria and maximum marking points available for learners to see – this helps them know what’s expected from them and what they need to cover in their submission. Favourite tip: Use ‘frequently used comments’ to speed up your grading process and to ensure that your grading is consistent.
Moodle Assignment: assessment with rubrics For grading with rubrics, teachers create a set of criteria with several levels of achievement, all displayed on a table. Sharing the rubric with learners is important, as it lets learners know how they’ll be assessed. For each submission, the rubric will be displayed to teachers, who then can select the level of accomplishment for each of the criteria just by clicking on it, as well as leave written feedback if necessary.
Moodle Assignment: assessment with marking workflow When you set up a marking workflow for an Assignment, it means that learners’ work can be assessed by several teachers. You can manually design the workflow and define the sequence of states (eg not marked , in marking , marked ), as well as allocate marking to another teacher.
This content has been extracted from the Moodle Academy webinar Assessment: exploring Assignments, facilitated by Moodle Education Advisor Anna Krassa. Watch the full webinar on our Moodle Academy site to see 7 real life examples on how you can combine submission types and grading types with availability and different types of feedback to create the right Assignment for your teaching and learning goals .

Announcing our latest Gold Sponsor for MoodleMoot Global 2024: Kialo Edu

E-learning Touch’ achieves Moodle Premium Certified Partner status in France

Tips for gaining your boss’s approval to attend MoodleMoot Global 2024!

Boost learning outcomes with Moodle Certified Integration Gamoteca
Teaching Commons
Quizzes and assignments in moodle make feedback easy.
Frequent assessment and timely, detailed feedback are hallmarks for successful course design in any situation, and all-the-more so as we move to online course delivery. I’ve been using Moodle quizzes and assignments for ten years and find that it fits a high-volume workflow in a way the efficiently makes use of my time while allowing for prompt and personal feedback to students.
In this 13-minute video,
- I construct a sample quiz from scratch in Moodle.
- construct a sample assignment in Moodle
- show a number of options available from within Moodle for me to quickly provide detailed feedback to students about their work.
Leave a Reply Cancel reply
Your email address will not be published. Required fields are marked *
Instructional Design & Technology Services, IITS
Haverford College
The Moodle Assignment: Collect and grade submitted work
The Moodle Assignment module lets you collect student assignments—including research papers, spreadsheets, presentations, photographs, and short audio or video recordings—online. The video below is a great resource for seeing how to add an assignment and to understand many of the most useful options. A text version of the information, along with some specific recommendations for Haverford faculty follows the video.
Add the assignment
Configure the assignment.
Now you need to configure assignment settings. By selecting the correct options, you will be able to grade student and give feedback the way you want. You can generally accept the defaults, but we recommend changing a few of the options to make submission easy for students and grading easy for you.
General settings
You must fill in the general setting to give your assignment a name. You need to enter an Assignment name –the name that students see on the main course page.
You can also give an assignment Description to explain the assignment to your student. What are your expectations for the assignment? What file format, if any, should they use? If you are allowing drafts, what do you expect in the drafts and what do you expect in the final project?
You can also upload instructions, templates, or other relevant files in the Additional files area.
Availability
OPTIONAL: Next, you will see an Availability section. Use this to give your students due dates. Date information from your assignments will flow to the Moodle calendar. Students can see upcoming assignments on their Moodle dashboard.
You can also set a “remind me to grade by” date; this will appear on your dashboard.
Submission types
OPTIONAL: In the Submission types area, determine what your students will be submitting. If you leave the defaults, students will submit one file, up to 5 MB in size. This works for many types of assignments. However , if you have any of the scenarios below, you will want to change the defaults.
Do you want students to submit a short reading response, or other short entry, directly into the assignment text area? Check the “ online text ” box.
Do you want to set a word limit for online submissions? In addition to checking the “ online text ” box, enable and set a “ Word limit .”
Do you want student to submit draft copies of their submission? Increase the “ maximum number of uploaded files .”
Will students submit documents over 20MB in size? 20MB is a pretty large file. Hopefully, students will be uploading files much smaller, to avoid taxing our system resources. If 20MB is not large enough, contact [email protected] and see if there is a better tool for your needs.

Do you want students to submit assignments in a particular format, such as a PDF, Microsoft Word format, Microsoft Excel, MP3 audio file, etc.? Click the “ Choose ” button and select your desired file type for student submissions or type the file extension name into the box. Require PDFs (“.pdf”) if you want to mark up assignments directly in the Moodle gradebook.
Feedback types
OPTIONAL: In the Feedback types area, state what type of feedback you will give students–and how you will give that feedback. All options should be checked by default. However, if any options are unchecked that may prevent you from delivering feedback in your preferred way.
Check the “ Feedback comments ” box to give comments on each submission.
Check the “ Offline grading worksheet ” box, if you want to enter grades in Excel and upload them to Moodle.
Check the “ Feedback files ” box, if you want to return student submissions with your markups, or submit other types of feedback files such as voice comments.
Set “ Comment inline ” to yes , for an easy way to comment on text students submit directly into the assignment tool. This is only useful if you enable the “Online Text” submission type.
More options
In addition to the settings above, many other options are available. A few options:
- group assignments
- blind marking , to hide student identities when you grade
- activity completion tracking, so you can make other activities in your course dependent upon this assignment, or just help students see where they are in the course
Once you have the desired settings, click the button to save and return to course .
Grade submissions and provide feedback
Once you have created your assignment activity and students have submitted work, you will want to collect and grade student submissions. You can either download all the assignments, grade them offline, and then upload feedback files with comments or mark papers directly in Moodle.
Download all submissions and mark papers outside of Moodle
The Moodle Assignment module lets you bulk downloaded student submissions for organization and offline grading. This can be helpful in a number of situations:
- Organize and locally store submitted assignments
- Provide assignments feedback using by marking-up student submissions using tools available in desktop or tablet apps such MS Word, Adobe Acrobat Pro, Explain Everything, etc.
- Efficiently enter grades and general feedback comments using Excel, which can be faster the Moodle online grading interface
- Grade assignments anywhere; internet access is not needed
It’s not hard to use the offline grading option, but it has a number of steps both within Moodle and your local computer operating system. Watch this video on off-line marking for more information.
Mark directly within Moodle
- Enter the student’s grade.
- Type or record feedback comments.
- Download the submission to look at it or annotate it outside of Moodle.
- Mark up a PDF submission.
- Return a file with your annotations or comments.
- Save the grade and continue to the next student.
- Depending upon what the student submitted, you may want to change the layout of your marking window.
- You can also select a different student from the upper right drop-down menu.
- By default, students are notified when you grade, but you can uncheck that option before saving.
Learning and Teaching
- Assessment & Feedback
How to create an Assignment
Before you start.
Note: We strongly recommend that you never re-use pre-existing assignments as this can cause lots of problems when it comes to grading, release of grades and grade transfer. Create fresh submission points for each assignment.
The steps below outline the basic steps to create an Assignment activity in your unit. Please also see our recommended approaches to creating formative and summative Individual, Group and offline Assignments
If you are instructing your students in how to submit their assignment, you can refer them to this guide: Moodle 4.1 Getting Started: An introductory guide for students
Create an Assignment
- From the relevant space, Turn editing on .
- Within each topic or week, click on the Add an activity or resource link to display the Activity Chooser (see below)
- Select Assignment from the menu that appears and click on Add

You can now give your assignment a clear and meaningful title and description, and modify the settings as appropriate.
How to manage the availability of an Assignment
- Where possible, do create submission points that are open for more than 24 hours.
- The allow submissions from setting specifies the date from which Moodle will allow students to submit their assignment
- The due date should reflect the assignment deadline
- Ensure that all due times/dates fall between 9am and 5pm BST during the working week.
Note: Students will still be able to submit after the due date has passed but these submissions will be clearly labelled as having been submitted late. If you want to prevent students from submitting after a specific date, you will also need to specify a cut-off date . Moodle will not accept submissions made after the cut-off date.
How to restrict access to an Assignment
Access restrictions can be used to manage student access to activities and resources including an Assignment. One of the most common restrictions needed is for date/time as shown below:
- In the Assignment settings, expand Restrict Access.
- Click Add Restriction
To add a date/time restriction:

- Click on the green Date button
- Enter the date and time that you want your Assignment to become visible to students. (In the example shown below, students will only be able to see the Assignment after 12.00pm on the 13th July 2023).

- Scroll to the bottom and click Save and return to course .
- REMEMBER to make sure that you then make the Assignment visible using Show/Hide:

- It is safe to Show the Assignment, as visibility is now controlled by the access restriction:

Other settings and considerations
See below for some common queries about Assignment creation.
How to include the Assignment question
- Use the Description box to provide details of the assignment question and hand in dates.
- Take time to make sure the assignment requirements and parameters are clear for students
- Do provide clear guidance to students on what they need to do.
- Do signpost your students to the support resources (e.g. Student Moodle Assignment FAQs , Skills Portal , Mitigating Circumstances , Academic Integrity and online resources ).
- Do not assume students will know what to do, and where they can get support and guidance.
- If you already have the assignment details in electronic form, or you have a template that you’d like the students to work with, you can attach the file using the Additional files setting: Drag and drop your file onto the blue arrow, or click on it to open your file browser to browse for the file.
Add a label to describe a ‘hidden’ Assignment
Example paragraph text. Do not amend this font / style unless you are creating an individual exception.
- If you have added a restriction to hide your assignment submission point prior to the assessment window opening, it is good practice to add a label to your Moodle course page to provide your students with summary information for the forthcoming assessment(s).
- Turn editing on then select Add an activity or resource at the bottom of the relevant course topic

- Select Add and choose the Text and Media Area option under Resources
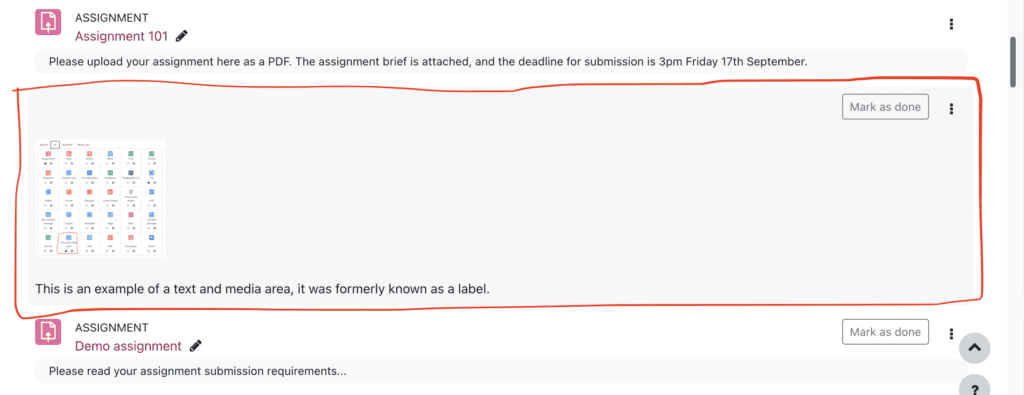
- Enter text to provide any summary information
- You can highlight sections of the text then choose the Link button in the toolbar to include hyperlinks to additional guidance (e.g. online submission guidance), or insert media as needed

- Choose Save and return to course . Your text and media area will appear at the bottom of the relevant topic. If you hover your cursor over it an icon of four arrows will appear, indicating that you can hold down the left mouse button to move the text and media area up or down the page.
About supported file submission types
- Although Moodle can accept any file type, we recommend PDF submission (which is the default setting) wherever possible.
- Should it be necessary for students to submit in other formats, you can allow this by adjusting the accepted file types setting:
- Under accepted file types click the green Choose button to select from a long list. Then scroll to the bottom of the list and Save changes .
- Please note that if you are using Ouriginal for originality checking, most word-processed files can be checked by Ouriginal , but some other file types cannot (The Ouriginal FAQ contains guidance on supported file formats).
How to set a word limit
- This is possible only where students are using online text submission (typing directly into the Moodle interface). It is strongly advised against using this submission type for substantive pieces of work (as any unexpected connectivity issues could result in loss of work)
- Instead, we recommend that students manage the word count in their file submission (e.g. using the word count tool in Microsoft Word), before exporting to PDF and uploading the resulting file to Moodle.
How to allow multiple file uploads
- Use the maximum number of uploaded files setting to specify how many files students can submit.
- By default, this setting allows each student to submit up to 20 individual files. Whilst there is no requirement to do so, you can of course reduce this number if you wish
About the 50mb maximum file upload size
- This is a global setting and increasing it at a site wide level would have significant implications for the Moodle service.
- Typically, the only files students may wish to upload, which would exceed the 50mb single file limit, would be video files. These should instead be uploaded to Panopto which, unlike Moodle, is a dedicated streaming service which can handle large video files.
- Please go here for instructions on setting up an assignment folder in Panopto.
Managing video/voiceover-based submissions
- Moodle has a 50MB upload limit to keep the platform working smoothly for everyone. Instead of uploading to Moodle, it is better to create a Panopto Student Assignment Folder .
- Please read the guidance for use as part of a formative workflow or a summative workflow on how to setup the Panopto submission point and also student instructions on preparing a presentation.
About feedback options
- Under the Feedback types setting all options are ticked by default. We recommend that you leave all options ticked to provide yourself with flexibility at the marking st.

- Under the Feedback types setting all options are ticked by default. We recommend that you leave all options ticked to provide yourself with flexibility at the marking stage.
- Feedback comments provides a small comment box in the Moodle PDF grading window. This is recommended for short summary feedback comments. The comments box also appears in the Offline Grading Worksheet .
- Annotate PDF refers to Moodle’s built in grading interface. If a student submits a PDF (which is the default setting), you will be able to read and annotate the file online (without having to download it).
- Feedback files allows you to upload comments as a separate file. Typically, many staff ask students to submit files as PDF documents, which can then be downloaded in a zip file, and annotated offline using Word’s comment/review functions. The files can then be added to a new zip folder and re-uploaded into Moodle (provided that the filenames are not changed).
- Offline Grading Worksheet (and Bath version ). These are typically used where an internet connection is likely to be unavailable or otherwise unreliable. They provide a downloadable .csv file (which can be opened and edited with Excel) with student names and grading and feedback columns, allowing for entry of grades and feedback whilst offline. It can then be re-uploaded to Moodle when a network connection is next available, and this will in turn populate all student Grade columns within Moodle. The Bath version is almost identical to the offline grading worksheet (and works in the same way) and differs only with the inclusion of University of Bath student numbers and the anonymisation of student names, which will be automatically replaced by Moodle with a Participant number unique to the assignment.
Configuring Submission settings
We recommend that you do not change these settings , as although they can be useful within particular contexts, they aren’t necessary for most assignments.
- Require students to click the submit button. Not recommended as students can sometimes ‘forget’ to click it, leaving the submission visible to markers, but still in draft.
- Require that students accept the submission statement means students must agree to a short statement confirming they are submitting their own work etc. Students will be required to accept a statement confirming that they are submitting their own work when taking Alternative Assessments. This will be set as the default, do not change this setting .
- Attempts reopened. Recommended setting is manually which allows you the discretion to allow another attempt for individual students if necessary.
How to make a Group Assignment
- For Group submissions, ensure you have first created Groups in Moodle and allocated students. You can add students manually or allow students to allocate themselves with the Group Choice activity.
- Students submit in groups If enabled students will be divided into Groups based on the default set of Groups or a custom Grouping. (In most instances you will not need to set up custom Groupings).
- A Group submission will be shared among Group members and all members of the Group will see when one member uploads the submission.
Important: You must set up Groups and allocate students to them before creating a Group assignment. Creation of a Group assignment where no Groups have been defined in Moodle, will allow students in different groups to see / overwrite each other’s submissions.
- Require group to make submission. If enabled, students not allocated to a Group cannot submit.
- By default a Group submission made by one member of a group will be placed against all members of the group in the Grading Table. Teachers can mark any member of the group. In the grading page for each student is a tick box allowing grades and feedback to be returned to all members of the group.

Configuring Notification settings
- Notify graders about submissions. We recommend you set to ‘no’ especially if you have a large cohort.
- Notify graders about late submissions may be useful to set to ‘yes’
- Default setting for “Notify students”. If set to ‘yes’ individual students receive a notification as soon as comments are uploaded. We recommend setting to ‘no’ and using Marking Workflow to manage feedback notifications en masse for any assignment already created.
About Grading options
Below is a brief overview and comparison of the different grading methods available for Moodle assignment:

About Grading scales vs points
- The default, and simplest option for grading is on a points basis out of 100, however you can also use a Moodle defined grading scale or create your own scale.
- Grading must be done out of 100% if you wish to use Grade Transfer to transfer grades to SAMIS
- Please see here for more information on advanced grading methods such as Marking Guides and Rubrics
About Grade Transfer to SAMIS
- It is possible to set up an Assignment in such a way that grades can be transferred into SAMIS by the Unit Convenor (who will have Teacher+ access to the course). Grade Transfer can be setup to take place at a pre-determined time, or alternatively, can be completed with a few clicks once marking and feedback have been released to students in Moodle.
- Full details on setting up Grade Transfer to SAMIS can be found here .
About Marking Workflow
- If Marking Workflow is switched on, it ensures that grades and feedback are not released to students *unless* you set the marking workflow to ‘released’. We recommend that you use it.
- Marking Workflow allows individual student submissions to be placed into different stages of the marking process. (These are: not marked; in marking; marking completed; in review; ready for release; released ).
- Marking Workflow may also be a useful tool for keeping track of marking and for managing moderation through Moodle.
- Please see here for details of how to Release Grades and Feedback using Marking Workflow
Configuring Ouriginal plagiarism detection settings
- Assignments submitted to Moodle can, in turn, be automatically submitted to Ouriginal.
- Ouriginal is an online text-matching service which checks electronic, text based submissions against a large database of material (including journal articles, websites and other student submissions) and produces a scored originality report for each piece of work
- Originality reports make no judgement regarding plagiarism, they simply highlight matching text fragments, enabling the reviewer to determine whether or not plagiarism has occurred.
- Once an assignment has been uploaded to Ouriginal, the application will produce two things:
- Ouriginal Analysis score – This number shows how much of a student’s assignment matches content from Ouriginal’s databases.
- Ouriginal Analysis report – Alongside a copy of the student’s original work, this report gives further detail on the specific sources of matching text.
- Ouriginal is enabled by default. For further details please see here .
How to grant an extension/allow late submission
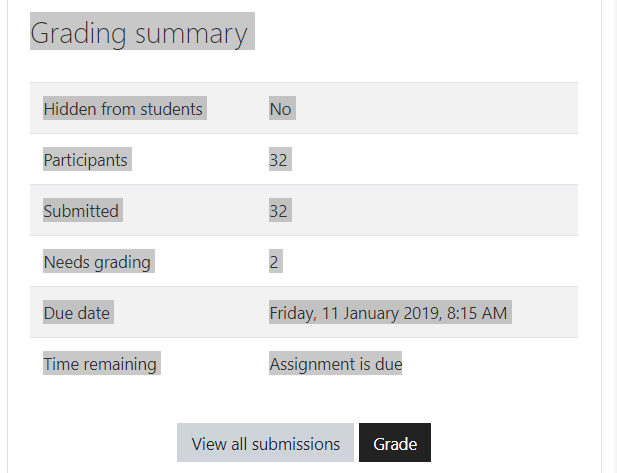
- Once the assignment has been created, clicking on the assignment link then View all Submissions will take you into the Grading Table where you will be able to see an overview of all submissions
- By default Moodle will accept submissions after the due date up until the (optional) cut-off date. (Any submissions received after the due date will be clearly marked as late)

To grant an extension for a student, locate the student concerned, and in the edit column adjacent to the student’s name, right click and choose grant extension and add the required extra time:

How to apply extensions in an anonymous Assignment
Moodle extensions enable students to submit their assignments after the specified due date (without Moodle highlighting the submission as being overdue). This also enables users to submit files after any cut-off date that may have been specified in the assignment. Combining this feature with Moodle’s Group functionality means that staff can apply extensions to select groups of users rather than to individuals – thus retaining the anonymity of the individual.
You should seek to create and populate a group within your Moodle course. This group should contain those individuals who require an extension and will enable you to differentiate them from the rest of the course participants (whilst still retaining anonymity).
Important note on retaining anonymity and maintaining student privacy : It’s important to avoid calling the group ‘Extensions’ as students can see Groups and their members from the Participants page. Instead use a generic Group A or Group 1 name. Also, do not put student names in the name of the groups as this obviously breaks anonymity.
To apply the Group functionality to the Assignment activity, go to the activity settings, scroll to the section entitled Common module settings and select Separate Groups within the Group Mode field. Once you have done this, remember to scroll to the bottom of the page and click on one of the Save buttons.
After applying this setting, extensions can be granted to group members as appropriate by visiting the Assignment submission overview screen, then selecting the group name from the top left-hand corner of this interface (as shown below).

Once the participants have been filtered in this way, members of the group can then be granted extensions as shown below.

Note : If students have been granted different extensions, you will require more than one group .
Clearly, true anonymity can only take place if more than one student is receiving an extension in this way.
How to tag an Assignment as Formative or Summative
Under the Tags setting type Formative or Summative and add the tag.

Related Articles
- Anonymous marking in Moodle
- Advanced Grading in Moodle
- Group Peer Review for Teachers
- How to mark an Assignment offline and upload feedback
- Using Ouriginal
- How to release grades and feedback
Article Contents
Moodle help faster than you can drink a cup of coffee
Add an Assignment
The assignment activity allows teachers to collect work from students, review it, and provide feedback, including grades. The work students submit is visible only to the teacher and not to the other students unless a group assignment is selected. Using Moodle for assignments is a great way to make assigning, collecting, and grading student work more efficient.
An assignment can also be used to remind students of "real-world" assignments they need to complete offline, such as artwork, presentations, and "field" work. In such cases, you can disable all submission types and indicate in the assignment description that students are not expected to upload anything for the assignment. Even if no files are collected, grades and feedback can be given, including advanced grading methods like rubrics.
Make sure to Turn editing on before getting started with this guide.
Video Overview
Part 1 Add the assignment activity
- In the week you want to add the assignment to, click Add an activity or resource .
- From the list of available activities, select Assignment and click Add .

Part 2 Edit the assignment settings
- Enter a "Name" for the assignment and put assignment instructions in the "Description" area. You may also attach any resources for your students in the "Additional files" area.
- In the "Availability" section, set the date you want the assignment to open ("Allow submissions from") and the date you want the assignment to close ("Due date"). Also decide if you will allow late submissions by setting a "Cut-off date." If a cut-off date is enabled, students will not be able to submit after the cut-off date has passed. If you do not enable a cut-off date, students will be able to submit late work indefinitely, although it will be time-stamped and marked as past due.
- In the "Submission types" section, select the kinds of media you want students to submit. The default is a File submissions (Word or PDF document, Powerpoint, spreadsheet, or other digital file). Online PoodLL allows students to submit audio or video recordings. Online text lets students type directly into the Moodle assignment. This is useful if you want students to submit links to their work.
- In the "Grade section," set-up grading for the assignmen. You'll probably want to keep the "Type" setting at the default Point , but change it to None if you are collecting ungraded files like contracts, agreements, or consent forms. In the "Maximum point" filed, add how many points you want the assignment to be worth (the default is 100). You can also choose a "Grade category" for the assignment. If you don't have grade categories set up, this will default to uncategorized.
- Click Save and return to course . You should now see the assignment in your course.
Google Assignments in Moodle
With Google Assignments, you can collect assignments and give feedback by integrating Google Drive and Moodle. What does this mean? You can harness Google’s rich feedback tools and grade directly from a Google Drive file right inside Moodle. Discover how to use Google Assignments to simplify your grading, feedback, and student file management.
Register for the self-paced workshop : Google Assignments in order to:
- Discover rich feedback capabilities within Google Assignments
- Compare similarities and differences between Google Assignments and Moodle grading panels
- Create assignments in Moodle, using Google Assignments
How to Get Started
Best practices.
- Screenshots
Step 1: Decide if Google Assignments is the right tool for your assignment
- Consider feedback: Because Google files (doc, etc.) are at the heart of Google Assignments, you can use Google’s in-line suggestions/corrections and commenting features to give rich feedback on Google Assignments submissions, which is helpful for rough drafts and final submissions alike. Frequently-used comments can be added to a comment bank. Note: If you want to annotate (i.e. draw) on a student’s submission in order to give feedback, the Moodle Assignment’s annotation tool is superior to the Google Assignments tool.
- Consider grading: When grading a Google Assignment submission, y ou can use a rubric that you create or upload. The grading has a lot of flexibility for awarding points. For example, if “Excellent” is 4 points, and “Good” is 3 points, you can award a student 3.5 points for “Very Good.” Grades awarded in Google Assignments are synced with the Moodle Gradebook.
- When a student submits a Google file to Google Assignments within Moodle, ownership of that file passes to you. The student retains ownership of a virtual “carbon copy” of what they submitted, and view only access to the original file that you now own.
- You open the submitted file item (which you now own) to provide feedback and grade the work. The student can see neither comments nor suggestions you are making until the assignment file is returned to them.
- You return the assignment file to the student with a simple click of a button. A virtual carbon copy of what you graded (with your comments) is saved in your Google Drive. Ownership of the original file is transferred back to the student, who can then see your comments and suggestions as well as their grade. You maintain “view only” access to the original file. The grade you awarded for the assignment is automatically added to the Moodle gradebook.
- Consider originality Reports: If you enable Originality Reports for an assignment, Google will perform a Google search on the text of the submitted file and compare the file to a repository of past student submissions through Assignments. Students will be able to run up to three Originality Reports on their work before submitting their file.
- Consider group work. Google assignments will only assign a grade to one person’s Moodle gradebook: the student who owns the file that is submitted for the assignment. If you’re assigning a group project, you’d have to manually enter grades to the other students in the group.
Step 2: If you are ready to use Google Assignments, follow these instructions for adding a Google Assignments activity to your Moodle space
- Give your students instructions and a low-stakes practice assignment before assigning a high stakes Google Assignment. Provide instructions on using Google Assignments , including a practice activity in the “Start Here” section of your Moodle course.
- Share and reuse rubrics to save time. You can download your rubric and to share with other instructors, and use previously uploaded rubrics for multiple assignments. See Google’s support documentation on rubrics , and find a useful rubric template here (clicking on the link will prompt you to make your own copy for editing).
- Award intermediary points as appropriate. When grading with a rubric, consider awarding intermediary points. For example, if “Excellent” is 4 points, and “Good” is 3 points, you could manually award a student 3.5 points for “Very Good.”
- Add to the comment bank for quicker feedback on common errors or strengths. See Google’s support documentation on giving feedback for instructions.
- Use originality reports to help students learn about academic integrity. With originality reports activated, students can check their own work three times before submitting to correct any issues. See a tutorial video from Google (~ 3 min long) about originality reports, or Google’s online help documentation .
- Provide your students with a template for their assignment. Attach files to an assignment when you create it so each student receives an individual copy to edit and turn in. This enables a uniform naming convention for the assignment. You might use a template to provide a paper prompt, a worksheet, or a guide for an assignment. If you don’t include a template, students will simply create their own Google document or file to turn in.
Google Assignment Interface in Moodle

Help Documentation from DELTA
- Overview of Google Assignments (LearnTech Knowledge Base)
- Google Assignments – Instructor Guide
- Google Assignments – Student Guide
- Quick introductory instructions you can link to in your Moodle side to get students started
External Resources
- Support documentation from Google
- Skip to primary navigation
- Skip to content
- Customer Support
- Client Area
- Cloudpap Computing (VM)
- Simple Backup
- Managed Databases
- Managed Kubernetes
- Object Storage
- Private Cloud
- Digital Agencis
- Hosting Providers
- Software and Platform Providers
- Block Storage
- Documentation
- Marketplace
- About Cloudpap

Moodle themes: How To Pick The Best + Examples

In the ever-evolving realm of online education, Moodle stands tall as a versatile and powerful learning management system.
With its user-friendly interface and comprehensive features, Moodle has earned its spot as a favorite among educators and learners alike.
However, what if we told you that you can take Moodle’s visual appeal to a whole new level? Welcome to the enchanting world of Moodle themes, where creativity knows no bounds!
Understanding Moodle Themes
Moodle Themes: Before we embark on this creative journey, let’s understand what Moodle themes are all about.
Moodle themes allow users to change the look and feel of their Moodle site, giving it a unique personality and charm. From color schemes and fonts to layout and design, a Moodle theme offers a canvas for creative expression.
Whether you’re an educational institution or an organization, customizing your Moodle site with a theme can breathe life into the virtual learning environment.
Theme Creation and Modification
Bringing Fantasies to Life: Picture this: an educational institution with a Moodle site that reflects its brand, culture, and vision. With Moodle’s customizable themes, this fantasy becomes a reality.
Moodle consultants, armed with their HTML and CSS prowess, can craft bespoke themes that align with an organization’s branding and design requirements.
From playful palettes to elegant layouts, the options are as endless as the Milky Way.
Installation and Configuration
The Symphony of Colors: Now that we’ve piqued your curiosity, let’s explore how you can install a new theme in Moodle. Fear not, for the process is as smooth as a moonlit sail.
As an administrator, navigate to the Theme selector in the Moodle interface, and embark on your cosmic journey.
Choose the theme that resonates with your vision, and with a few clicks, watch as the stars align, and your Moodle site dons its new cosmic garb.
Customization and Branding
Creating Your Moodle Constellation: Who says learning can’t be fun? Consultants can sprinkle the magic of customization on your Moodle site, ensuring it’s a reflection of your organization’s identity.
From colors that evoke emotions to fonts that cast enchantments, a cohesive and branded learning environment emerges. Embrace the cosmos and let your Moodle site sparkle like a distant galaxy.
Responsive Design
Adapting to All Dimensions: In this age of diverse devices, ensuring that your Moodle site shines bright on all screens is crucial.
Fear not, for Moodle themes can be responsive, adjusting their celestial beauty to desktops, tablets, and mobile phones alike.
Whether learners roam the galaxy on their smartphones or traverse the nebulae on their laptops, a seamless experience awaits them.
Integration and Compatibility
Harmony of Elements: In the grand symphony of Moodle, themes play harmoniously with other plugins and functionalities.
A skilled consultant ensures that your chosen theme dances gracefully with other Moodle elements, creating a celestial alignment of user experience.
From LTI tools to custom modules, compatibility is the secret to a flawless performance.
Troubleshooting and Support
Navigating the Cosmic Maze: Even in the vast cosmos of Moodle, challenges may arise.
But fear not, for Moodle consultants are the celestial navigators, guiding you through any theme-related issues.
From installation conundrums to layout puzzles, they unravel mysteries, restoring serenity to your Moodle universe.
Training and Documentation
Guiding Stars: As administrators and users embark on their Moodle adventures, consultants light the way with expert training and documentation.
Equipped with celestial knowledge, they empower you to navigate the depths of theme settings and customization options. They are the guiding stars in your quest for Moodle brilliance.
The Stellar Range of Moodle Themes
The Dazzling Constellations: Wondering about the popular Moodle themes that illuminate the Moodle galaxy? Look no further, for we present a few stars from the stellar range:
Edwiser RemUI: Unleash the Power of Elegance
Behold, the cosmic elegance of Edwiser RemUI! This theme is not your run-of-the-mill design; it’s a constellation of seamless user experience and captivating aesthetics.

With its intuitive layout and sleek interface, Edwiser RemUI is a meteor shower of creativity that will leave your learners in awe.
Brite: A Luminous Journey Through Simplicity
Gaze into the luminous glow of Brite, a theme that takes you on a journey through simplicity.
Light up your Moodle platform with its minimalist design, providing a clutter-free atmosphere that ensures learners can focus on the cosmic knowledge at their fingertips.
Brite is where elegance meets efficiency, making it a favorite among those who seek brilliance in subtlety.
Lambda: Where Flexibility and Versatility Converge
In the vast cosmic ocean of Moodle themes, Lambda stands out as a radiant star of flexibility and versatility.

Its adaptability to various educational settings and devices is akin to a chameleon’s ability to blend into any environment.
Prepare for a dynamic cosmic experience, with Lambda seamlessly adjusting to your educational universe.
Edumy: An Enchanted Galaxy of Gamification
Looking to infuse your Moodle with an enchanted galaxy of gamification? Look no further than Edumy! This theme is like a nebula of excitement, engaging learners through interactive elements and rewarding experiences.

The gravitational pull of Edumy will have your students orbiting around educational achievements with enthusiasm.
New Learning: Illuminating the Path to Knowledge
For those embarking on a journey of discovery, New Learning is the guiding star. This theme illuminates the path to knowledge, making learning an enchanting experience.

With its intuitive design and cosmic color schemes, New Learning creates a captivating atmosphere for learners to explore the universe of education.
Enlightlite: A Lustrous Blend of Clarity and Grace
Enlightlite shines as a lustrous blend of clarity and grace, making it an unmatched constellation of elegance. Its user-friendly interface ensures that learners navigate through the cosmos of knowledge with ease.

This theme’s celestial radiance will undoubtedly leave a lasting impression on anyone who embarks on an educational voyage with it.
Klass: A Timeless Journey Through Tradition
Journey back in time with Klass, a theme that pays homage to the timeless traditions of education.

Its classic design is reminiscent of ancient constellations, guiding learners through the cosmos of knowledge while honoring the roots of education.
Klass is a celestial reminder that the pursuit of wisdom transcends the ages.
Eguru: Paving the Way for Educators
Teachers, this one’s for you! Eguru paves the way for educators to create their cosmic academies of knowledge.

With features tailored for seamless course creation and management, Eguru empowers instructors to guide their students on an educational odyssey like no other.
It’s time to harness the power of Eguru and embark on a stellar teaching adventure.
Academi: Where Innovation Meets Education
Academi is the intersection where innovation meets education, forming a brilliant supernova of possibilities.

This theme embraces modern design and cutting-edge features, propelling your Moodle platform to the forefront of the educational cosmos.
Embrace Academi, and witness your learners’ journeys transcend the boundaries of traditional education.
LearnR: Unraveling the Cosmic Mysteries
In the boundless universe of Moodle themes, LearnR is the cosmic key to unraveling mysteries.
Its engaging interface and interactive elements encourage learners to delve deep into the cosmic mysteries of knowledge. With LearnR, the quest for wisdom becomes an enthralling voyage through galaxies of information.
Customizing an Existing Moodle Theme
Adding Your Unique Flare: Sometimes, the celestial journey involves embracing the beauty of an existing Moodle theme and adding your unique flare to it. Fear not, for the cosmos allows for such celestial craftsmanship.
Step 1: Navigate to the Theme selector
As an administrator, travel to the Theme selector in your Moodle interface. Here, you’ll find the chosen theme waiting to embrace your creativity.
Step 2: Explore Theme Settings
Many Moodle themes offer a realm of customization options through the theme settings page. Colors, fonts, and layouts await your artistic touch.
Bring forth your creativity and conjure a harmonious blend of design elements.
Step 3: Modify CSS
For those who seek advanced customization, the path to CSS awaits. Dive into the code, edit CSS files, and witness your unique vision come to life.
Adjust rules, craft styles, and let your imagination soar through the cosmic realm of possibilities.
Step 4: Upload Custom Images
In this celestial odyssey, uploading custom images like logos and backgrounds is a cosmic delight. Unveil your organizational identity and witness the magic unfold.
Step 5: Preview and Save Changes
As you weave your cosmic tapestry, the preview function becomes your telescope to the future.
Gaze upon your customizations, and when the constellations align, save your changes to witness your Moodle site transformed.
Embark on Your Cosmic Journey: There you have it, intrepid explorers of the Moodle universe.
The realm of Moodle themes awaits your creative touch. So, don your creative capes, wield your HTML and CSS wands, and venture forth to create a celestial Moodle experience that delights learners and educators alike.
The stars are aligned, and the Moodle cosmos is yours to shape! Happy Moodle theming!
You may also like

How to Calculate Moodle Cost Per Student

Moodle Hostinger: What To Know
Adding {{itemName}} to cart
Added {{itemName}} to cart
Documentation
Assignment activity.
- Managing activities
- BigBlueButton
- LTI External tool
What is the Assignment activity?
Assignments allow students to submit work to their teacher for grading. The work may be text typed online or uploaded files of any type the teacher’s device can read. Grading may be by simple percentages or custom scales, or more complex rubrics may be used. Students may submit as individuals or in groups.
--> Continue Dismiss