How-To Geek
How to unlock read-only powerpoint presentations.
A read-only PowerPoint presentation can quite literally be unlocked at the click of a button. Here's how.

Quick Links
Unlock a read-only presentation, why make a powerpoint read-only, how to make a powerpoint read-only.
If you want unrestricted editorial rights to a read-only PowerPoint presentation, then you have to unlock it. The good news is that you can open it in a few simple clicks. Here’s how.
There are two ways to tell if a presentation is a read-only file. The first is if you see the words “Read-Only” after the title of the presentation. The second is if you see a yellow message bar across the top of a presentation with a message letting you know the document has limited access.
Next to the yellow banner message will be a button that reads “Edit Anyway." Click that button to unlock the PowerPoint.
The yellow bar should disappear along with the “Read-Only” text that appeared after the presentation title. Your PowerPoint will now be editable.
As the saying goes, there's more than one way to cook an egg. The same applies to unlocking a presentation. Although this method involves a few extra steps, we wouldn't be real geeks if we didn't show you how.
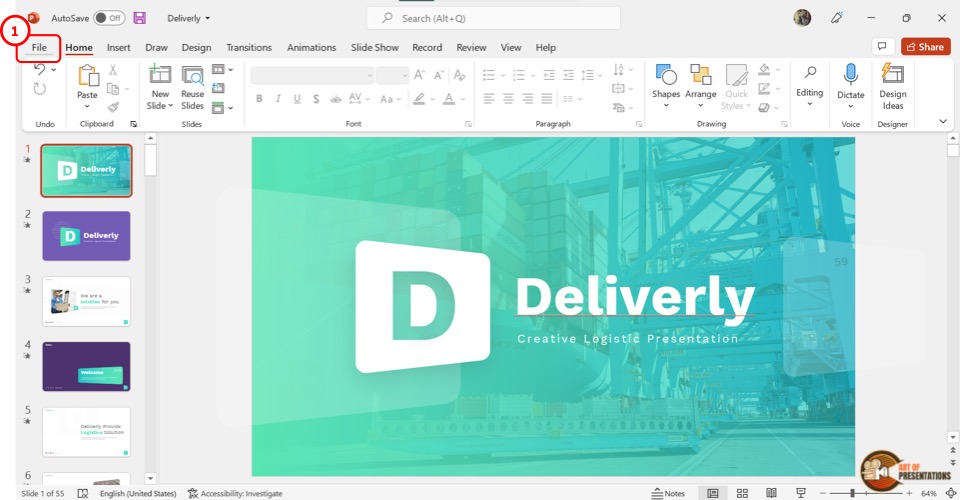
First, open the read-only presentation and select the “File” tab.
You’ll be moved in the “Info” menu. Here, you’ll see the “Protect Presentation” option is marked in yellow and has a message displayed next to it---the presentation has been marked as final to discourage any editing. Go ahead and select “Protect Presentation."
From the submenu, select “Mark as Final." Clicking this will undo the lock.
You’ll now see that the yellow banner and its accompanying message next to the “Protect Presentation” option disappears. The “Read-Only” text next to the presentation title also disappears.
A presentation might be locked for any of several valid reasons. For starters, people use it mainly to discourage edits; they're merely alerting recipients the presentation they've received is the final version provided by the original author. Read-only status can also prevent accidental edits caused by human error.
Making a presentation read-only is more polite than asking people not to edit it than it is an actual protective measure of your content. However, taking the extra steps to let people know you don't want your content to be edited is a good thing to do.
Now that we know how to unlock a PowerPoint presentation and why it was likely locked in the first place, here's how to re-enable read-only.
Open the presentation you want to make read-only and select the "File" tab.
You'll then be in the "Info" menu. Select "Protect Presentation" to open a drop-down menu. Click "Mark as Final."
A dialogue box will then appear, letting you know the presentation will be marked as final and saved. Click "OK."
Now, when you send out the presentation, it will display the "Marked as Final" message bar, alerting the recipients that the presentation is read-only.
- PRO Courses Guides New Tech Help Pro Expert Videos About wikiHow Pro Upgrade Sign In
- EDIT Edit this Article
- EXPLORE Tech Help Pro About Us Random Article Quizzes Request a New Article Community Dashboard This Or That Game Popular Categories Arts and Entertainment Artwork Books Movies Computers and Electronics Computers Phone Skills Technology Hacks Health Men's Health Mental Health Women's Health Relationships Dating Love Relationship Issues Hobbies and Crafts Crafts Drawing Games Education & Communication Communication Skills Personal Development Studying Personal Care and Style Fashion Hair Care Personal Hygiene Youth Personal Care School Stuff Dating All Categories Arts and Entertainment Finance and Business Home and Garden Relationship Quizzes Cars & Other Vehicles Food and Entertaining Personal Care and Style Sports and Fitness Computers and Electronics Health Pets and Animals Travel Education & Communication Hobbies and Crafts Philosophy and Religion Work World Family Life Holidays and Traditions Relationships Youth
- Browse Articles
- Learn Something New
- Quizzes Hot
- This Or That Game
- Train Your Brain
- Explore More
- Support wikiHow
- About wikiHow
- Log in / Sign up
- Computers and Electronics
- Presentation Software
- PowerPoint Presentations
How to Unlock a Read Only PowerPoint Presentation (in 4 Steps)
Last Updated: December 29, 2021
This article was co-authored by wikiHow staff writer, Darlene Antonelli, MA . Darlene Antonelli is a Technology Writer and Editor for wikiHow. Darlene has experience teaching college courses, writing technology-related articles, and working hands-on in the technology field. She earned an MA in Writing from Rowan University in 2012 and wrote her thesis on online communities and the personalities curated in such communities. This article has been viewed 20,566 times. Learn more...
If you see text in a banner that warns you the file is read-only, the original author marked it as final and discourages editing. This wikiHow will teach you how to unlock a read-only PowerPoint manually. Otherwise, you can click Edit Anyway within the banner.

- A menu will drop down from the lock icon.

- The "Read-Only" text is gone from the title and the yellow banner will disappear, which means you can edit the PowerPoint. [1] X Research source
- To return the file to read-only, repeat the process to select "Mark as Final."
Expert Q&A
You might also like.

- ↑ https://www.howtogeek.com/437502/how-to-unlock-read-only-powerpoint-presentations/
About This Article

1. Open the PowerPoint project. 2. Click the File tab. 3. Click Protect Presentation. 4. Click Mark as Final . Did this summary help you? Yes No
- Send fan mail to authors
Is this article up to date?

Featured Articles

Trending Articles

Watch Articles

- Terms of Use
- Privacy Policy
- Do Not Sell or Share My Info
- Not Selling Info
wikiHow Tech Help Pro:
Level up your tech skills and stay ahead of the curve
How to Unlock Read Only PowerPoint Presentations
- Small Business
- Business Communications & Etiquette
- Presentations
- ')" data-event="social share" data-info="Pinterest" aria-label="Share on Pinterest">
- ')" data-event="social share" data-info="Reddit" aria-label="Share on Reddit">
- ')" data-event="social share" data-info="Flipboard" aria-label="Share on Flipboard">
How to Convert a PowerPoint to an RTF
Can i turn off 4g on iphone 5, how to automatically text wrap in powerpoint 2007.
- How to Convert PowerPoint Presentations to an HTML Format
- How to Open a Word for Mac Document in Microsoft Word for PC
Microsoft PowerPoint's "Mark as Final" feature makes your business presentation read-only to prevent accidental changes. It is typically enabled prior to distribution so your workers, clients or business partners are assured a final, unaltered version of your PowerPoint presentation. Marking the presentation as final also reminds you of its completed status. If you later decide to make changes, removing the Mark as Final setting will permit you to edit the presentation.
Open the read-only PowerPoint presentation and click the "File" tab.
Click "Info" from the left pane.
Click "Protect Presentation" and select "Mark as Final." This acts as a toggle selection. If the presentation was read-only, it will now be editable, and if it was not protected, the Mark as Final option is now enabled.
Press "Ctrl-S" to save the presentation with the Mark as Final feature disabled.
- Microsoft Office: Remove Mark As Final From a Presentation
- The Mark as Final feature is not a security measure. Anyone with access to the file can disable this option.
C. Taylor embarked on a professional writing career in 2009 and frequently writes about technology, science, business, finance, martial arts and the great outdoors. He writes for both online and offline publications, including the Journal of Asian Martial Arts, Samsung, Radio Shack, Motley Fool, Chron, Synonym and more. He received a Master of Science degree in wildlife biology from Clemson University and a Bachelor of Arts in biological sciences at College of Charleston. He also holds minors in statistics, physics and visual arts.
Related Articles
How to make powerpoint uneditable, how to mark a document as final in microsoft word, does powerpoint have an option that would allow someone to open & print but not allow them to edit, how to rotate a slide in powerpoint, how to alphabetize last names in excel, how to display a ruler on powerpoint 2007, how to: powerpoint looping presentations, how to wrap text in microsoft excel 2003, how to read-only on a network in excel, most popular.
- 1 How to Make PowerPoint Uneditable
- 2 How to Mark a Document as Final in Microsoft Word
- 3 Does PowerPoint Have an Option That Would Allow Someone to Open & Print but Not Allow Them to Edit?
- 4 How to Rotate a Slide in PowerPoint
How to Save a Copy of a PowerPoint? [Step-by-Step Guide!]
By: Author Shrot Katewa
![How to Save a Copy of a PowerPoint? [Step-by-Step Guide!]](https://artofpresentations.com/wp-content/uploads/2022/03/Featured-Image-How-to-Save-a-Copy-of-PowerPoint-Presentation.webp "how to copy a read only powerpoint presentation")
When creating a presentation using PowerPoint, you may be used to saving the presentation from time to time in order to prevent any data loss. But, what if you want to create another copy of your presentation? How do you save a copy of your PowerPoint presentation?
In this article, we shall understand the process of saving a copy of any PowerPoint presentation in a step-by-step manner. Plus, we shall also take a look at how to save a presentation as a read-only file! That, and much more!
So, let’s get started!
1. How to Save a Copy of a PowerPoint Presentation?
Let’s address the elephant in the room straight away! How do you create a copy of a PowerPoint presentation?
Microsoft PowerPoint offers a “Save A Copy” feature which allows you to save the changes in your PowerPoint presentation in a separate copied file rather than the original file.
In some versions of Microsoft PowerPoint, the “Save A Copy” option is replaced by the “Save As” option. However, the features available through both options are fully identical.
Let’s understand the process of saving a copy of a PowerPoint presentation in further detail –
1a. How to Save a Copy of PowerPoint to Desktop?
To save a copy of a PowerPoint presentation on your desktop, follow the 3 simple steps.
Step-1: Click on the “File” tab
The first step is to click on the “File” tab. It is located on the left corner of the menu ribbon at the top of the screen. This will open the “File” menu.
Step-2: Click on the “Save A Copy” option

Depending on the version of your Microsoft PowerPoint, you have to click on the “Save A Copy” or the “Save As” option from the sidebar located on the left side in the “File” menu.
Step-3: Click on the “Save” button
In the “Save A Copy” screen, you can click on the “Save As Options” box and save a copy of your presentation in several different formats. Then all you have to do is click on the “Save” button beside the “Save As Options” box to save a copy of your presentation.
1b. Shortcut to Save a Copy of a PowerPoint Presentation
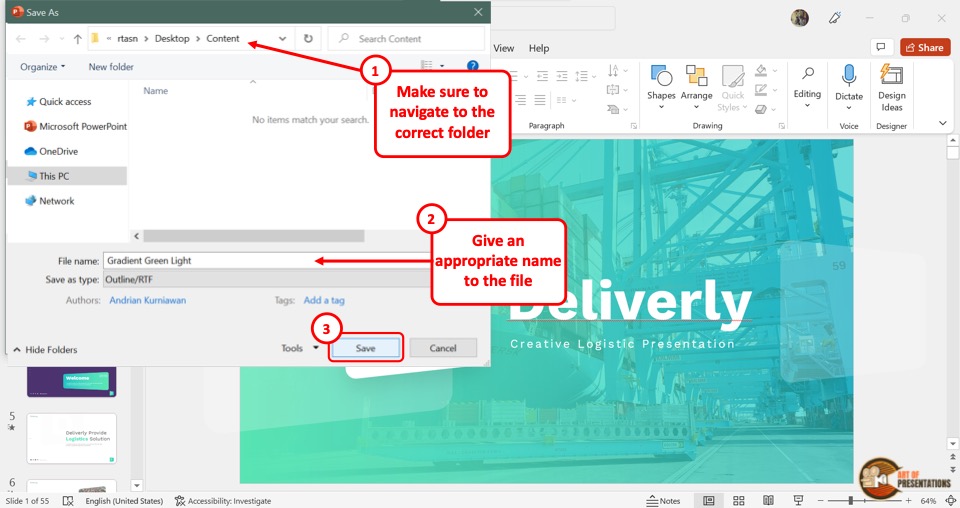
In Microsoft PowerPoint, you can also save a copy of your presentation using the keyboard shortcuts. All you have to do is press the “Alt+F2” keys (Cmd+Shift+S on Mac) on your keyboard.
This will directly open the “Save As” dialog box where you can click on the “Save as type” box to change the file format.
Make sure that you choose the correct location for saving the file from the navigation pane. Give an appropriate name to the file. Finally, click on the “Save” button.
2. How to Save a Copy of a Read-Only PowerPoint Presentation?
By saving the “Read-Only” version of a PowerPoint presentation , you can avoid any accidental edits in the original presentation file. A “Read-Only” PowerPoint file will force the user to create a copy of the presentation if any changes are made.
Thus, the original file is maintained as-in. To save a PowerPoint presentation as a read-only copy, follow the easy steps mentioned below –
Step-1: Click on the “File” Tab
In the menu ribbon located at the top of the screen, click on the “File” tab. In the sidebar located on the left side of the “File” menu, click on the “Info” option.
Step-2: Click on the “Alway Open Read-Only” option
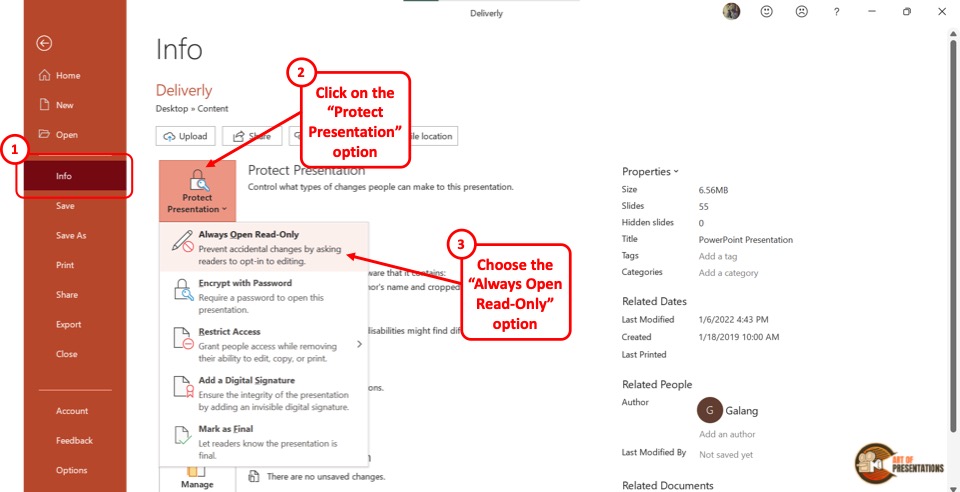
In the “Info” screen, click on the “Protect Presentation” button which is the first button in the left column. In the dropdown menu under “Protect Presentation” , click on the “Always Open Read-Only” option.
Also Read – 7 Ways to Protect Your PowerPoint Presentation from Editing!
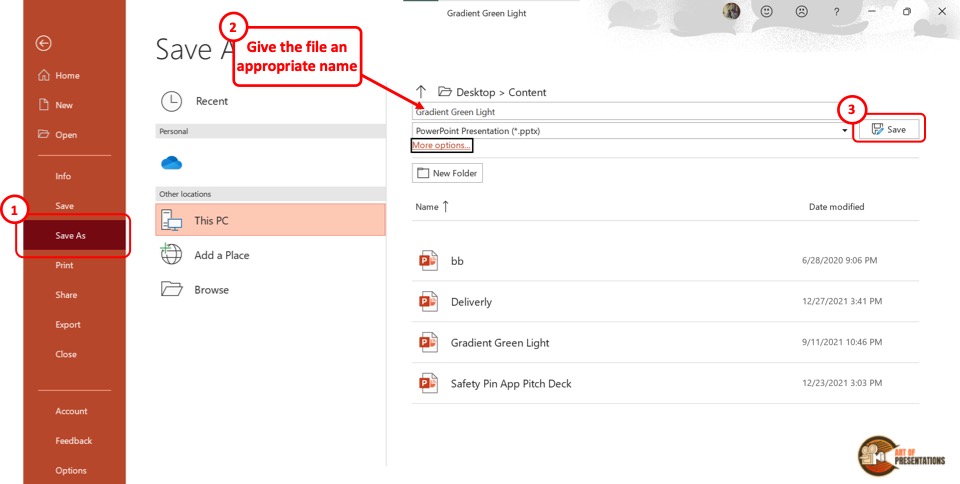
Finally, you have to click on the “Save A Copy” option in the sidebar on the left side of the “File” screen. Then click on the “Save” button to save a read-only copy of the PowerPoint presentation.
3. How to Save a Copy of a Shared PowerPoint Presentation?
If your colleague or client has shared a copy of a PowerPoint presentation using PowerPoint for the web or Shared Drive, you can easily download and save a copy of the shared presentation to your device.
Here’s what you need to do –
Step-1: Click on the “Save as” option
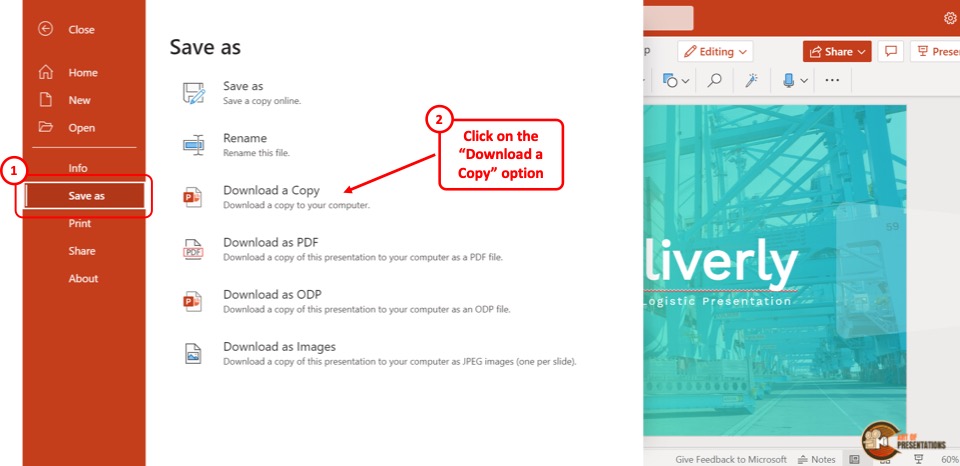
In the menu ribbon located at the top of the screen, click on the “File” tab. Then click on the “Save as” option from the “File” menu. Under the “Save As” option, click on the “Download a Copy” option.
Step-2: Click on “Download”
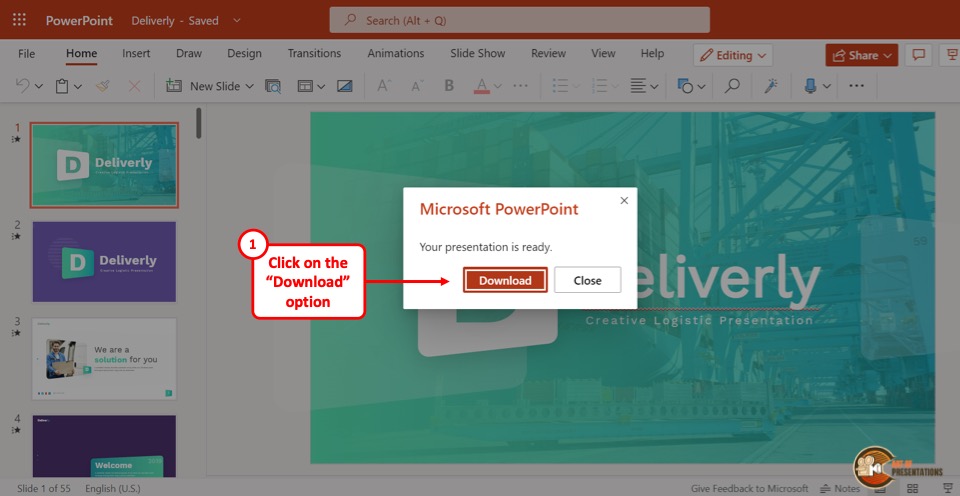
Now all you have to do is click on the “Download” button in the dialog box prompted by Microsoft PowerPoint.
4. How to Save a Copy of PowerPoint Without Notes?
In Microsoft PowerPoint, you can save a copy of the file without the notes.
To do so, you have to first remove the speaker notes, and then use the “Save A Copy” option. Here are 5 quick and easy steps that you can follow in order to save a copy of your PowerPoint file without notes –
In the menu ribbon, click on the “File” tab. Then click on the “Info” option from the “File” menu.
Step-2: Click on “Check for Issues”
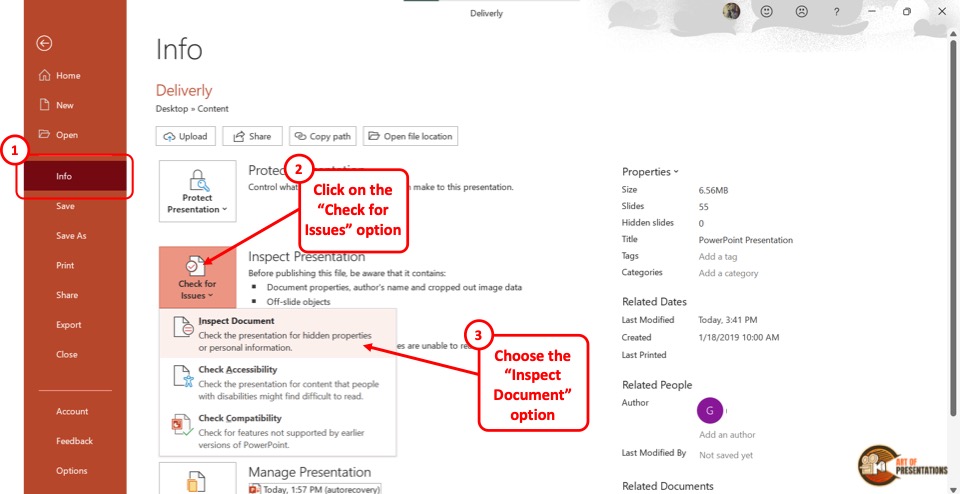
In the “Info” screen, click on the “Check for Issues” button. Then click on the “Inspect Document” option from the dropdown menu. This will prompt a dialog box.
Step-3: Click on the “Inspect” option
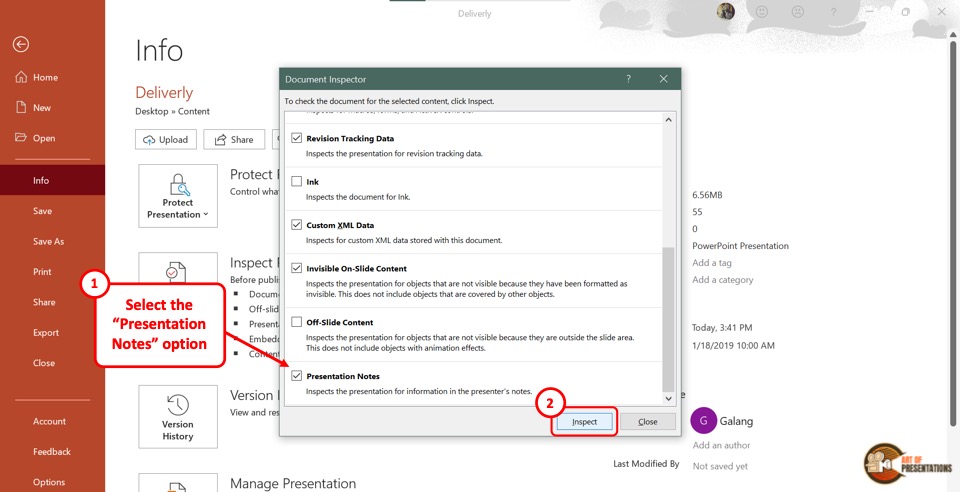
In the “Document Inspector” dialog box, scroll all the way to the bottom and make sure the “Presentation Notes” option is selected. Then click on the “Inspect” button at the bottom of the dialog box.
Step-4: Click on the “Remove All” option
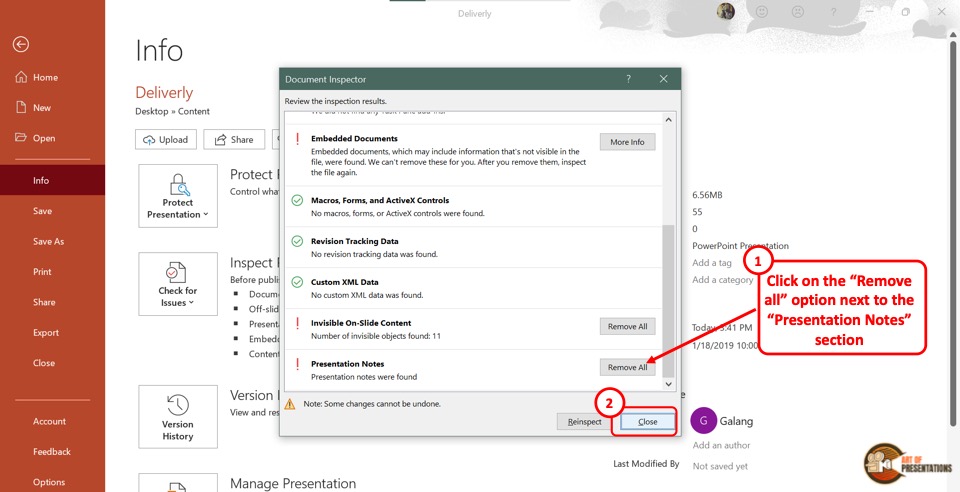
Once the inspection results are shown in the “Document Inspector” dialog, scroll to the bottom again to find the “Presentation Notes” option.
Then click on the “Remove All” button at the right side of the “Presentation Notes” option. Now all you have to do is click on the “Close” button at the bottom of the dialog box to finish the process.
Step-5: Click on the “Save” option
The final step is to click on the “Save A Copy” option in the sidebar of the “File” menu. In the “Save A Copy” screen, click on the “Save” button to save the presentation without notes.
5. How to Create a Copy of an Existing Presentation in a New PowerPoint File?
To create a copy of an existing presentation, you have to first open a new Microsoft PowerPoint file.
Then you can use the “Reuse Slides” feature to copy the existing presentation. The detailed process is explained in the following steps –
Step-1: Click on the “Reuse Slides” button
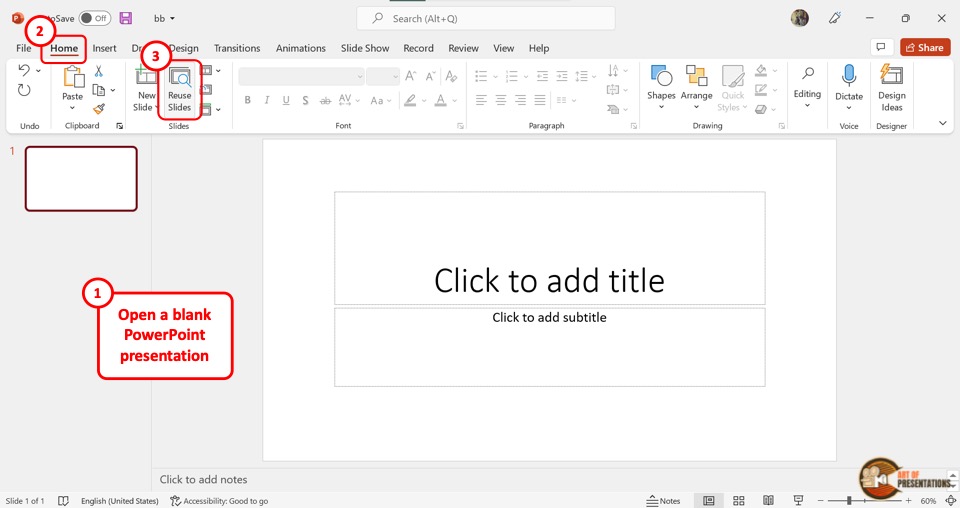
In the new PowerPoint presentation, click on the “Reuse Slides” button. It is located in the “Slides” group of the “Home” menu. This will open a sidebar on the right side of the screen.
Step-2: Click on “Choose Content”
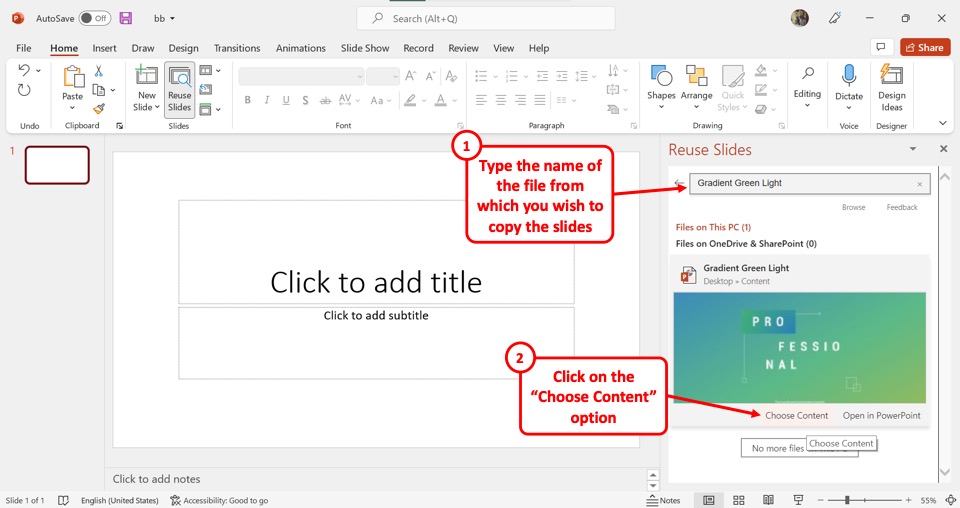
In the “Reuse Slides” sidebar, click on the “Search” box.
Then type in the file name of the presentation which you want to copy. Under the thumbnail of the PowerPoint presentation, click on the “Choose Content” option.
Step-3: Click on the “Insert All” option
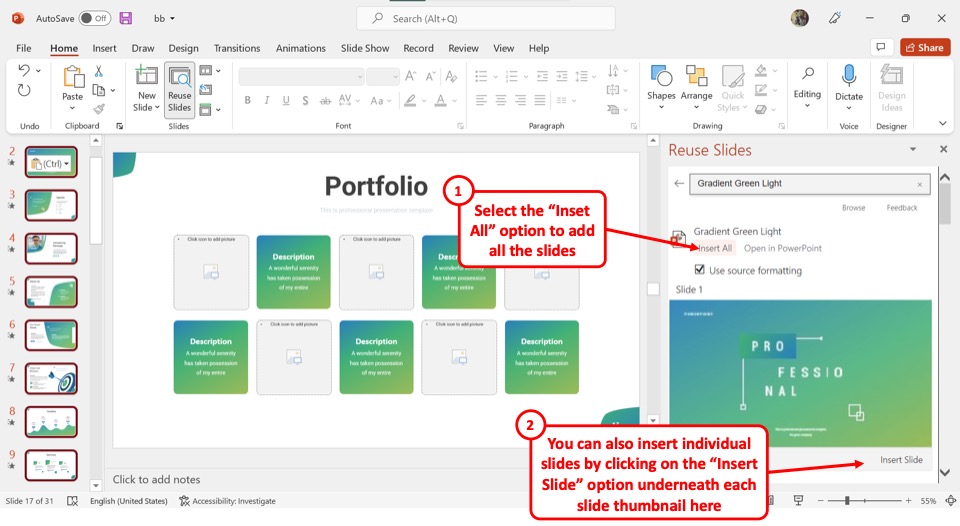
Now all you have to do is click on the “Insert All” option to copy the entire PowerPoint presentation into the new file.
You can also click on the “Insert Slide” option under each slide thumbnail to copy a few selected slides.
6. How to Save a Copy of PowerPoint Presentation in Other Formats?
Microsoft PowerPoint allows you to save a copy of your presentation in multiple file formats. I’ve written an entire article detailing the various formats in which you can save a PowerPoint presentation.
Make sure you check out the other article on “How to Save a PowerPoint Presentation in Multiple Formats” for all the details!
However, in a nutshell, to save a copy of your presentation in other formats, click on the “Save A Copy” option in the “File” menu. In the “Save A Copy” screen, click on the “Save As Type” box which is the second box in the right column.
Now all you have to do is click on your preferred file format from the dropdown menu. For complete details, make sure you check out the article.
Credit to drobotdean (on Freepik) for the featured image of this article (further edited)
How to Copy a PowerPoint to a New PowerPoint: A Step-by-Step Guide
Copying a PowerPoint to a new PowerPoint is a straightforward task. You simply need to open the original presentation, save it with a new name, and then make the desired changes to the new copy. By doing this, you’ll have two separate PowerPoint files: the original and the copy.
After completing this action, you will have two PowerPoint presentations. The original will remain unchanged, while the copied version can be edited and customized without affecting the original file.
Introduction
Have you ever found yourself needing to duplicate a PowerPoint presentation, perhaps to create a similar one for a different audience or to make significant changes without losing the original? Whatever the reason, it’s a common need in the world of presentations. Copying a PowerPoint to a new PowerPoint can save you time and effort, especially if the new presentation will have similar content or structure. It’s also a valuable skill for anyone who often uses PowerPoint for work, school, or personal projects.
By understanding how to copy a PowerPoint presentation, you can more efficiently create multiple versions of a presentation, experiment with design changes, or prepare multiple presentations for different purposes. This guide will walk you through the simple steps to duplicate your PowerPoint presentation, as well as highlight the advantages and considerations of doing so.
Step by Step Tutorial on How to Copy a PowerPoint to a New PowerPoint
This section will guide you through the process of copying an existing PowerPoint presentation to create a new one.
Step 1: Open the Original PowerPoint Presentation
Open the PowerPoint application and the presentation you want to copy.
By opening the original presentation, you can ensure that all the content you want to duplicate is readily accessible before creating a copy.
Step 2: Save the Presentation with a New Name
Go to ‘File’ > ‘Save As’ and choose a new name and location for your copied presentation.
Saving the original presentation with a new name creates a separate file, allowing you to maintain the original while working on the new copy.
Step 3: Make the Desired Changes to the New Copy
Edit the newly copied presentation to suit your needs, whether it’s changing the content, design, or layout.
Once you’ve created the copy, you can freely make changes without worrying about altering the original presentation. This is the step where you can personalize the new PowerPoint for its intended purpose.
Additional Information
When you’re working on copying a PowerPoint to a new PowerPoint, there are some additional tips and tricks that can further streamline the process. For instance, if you’re looking to copy only specific slides rather than the entire presentation, you can use the ‘Duplicate Slide’ feature. This is particularly useful if the new presentation will only share certain parts with the original.
Another helpful tip is to use the ‘Slide Master’ to ensure that any changes you make to design elements like fonts, colors, and backgrounds are applied consistently across all slides in the new presentation. And remember, always double-check which file you’re working on to avoid accidentally overwriting your original presentation.
- Open the original PowerPoint presentation.
- Save the presentation with a new name.
- Make the desired changes to the new copy.
Frequently Asked Questions
Can i copy only selected slides from a powerpoint presentation.
Yes, you can select specific slides and use the ‘Duplicate Slide’ option to copy them into a new presentation.
Will copying a PowerPoint presentation also copy the animations and transitions?
Yes, copying a presentation preserves all elements, including animations, transitions, and media.
How do I ensure that I don’t overwrite the original presentation?
Always double-check the file name and save the copy with a distinct name in a different location.
Can I copy a PowerPoint presentation to a different version of PowerPoint?
Generally, yes, but some features may not be compatible if you’re moving between significantly different versions.
Is it possible to automate the copying process for multiple presentations?
While there’s no built-in feature for this, you could use macros or third-party tools to automate the copying process.
Copying a PowerPoint to a new PowerPoint is a useful skill that can greatly enhance your productivity and presentation management. Whether it’s for backing up your work, creating variations of a presentation, or simply experimenting with new ideas, understanding how to effectively duplicate your PowerPoint files is an asset.
With the simple steps outlined in this guide, you can confidently tackle this task and keep your presentations organized and efficient. Always remember to manage your files carefully to prevent confusion and to ensure that your original work remains intact. Now that you’ve learned how to copy a PowerPoint, you’re ready to tackle your next presentation project with ease.

Matthew Burleigh has been writing tech tutorials since 2008. His writing has appeared on dozens of different websites and been read over 50 million times.
After receiving his Bachelor’s and Master’s degrees in Computer Science he spent several years working in IT management for small businesses. However, he now works full time writing content online and creating websites.
His main writing topics include iPhones, Microsoft Office, Google Apps, Android, and Photoshop, but he has also written about many other tech topics as well.
Read his full bio here.
Share this:
Join our free newsletter.
Featured guides and deals
You may opt out at any time. Read our Privacy Policy
Related posts:
- How to Save Powerpoint as PDF with Notes
- How to Duplicate a Picture on an iPhone
- Can I Convert My Powerpoint to Google Slides?
- How to Make a Powerpoint Slide Vertical in Powerpoint 2013
- How to Duplicate a Slide in Powerpoint 2010
- How to Change Hyperlink Color in Powerpoint 2010 (An Easy 5 Step Guide)
- How to Loop a Slideshow on Powerpoint 2013
- Can You Save a Powerpoint as a Video in Powerpoint 2013?
- How to Insert Slides from Another Presentation in Powerpoint 2010
- How to Convert a PowerPoint to Word and Edit with Ease
- How to Find and Delete Duplicate Files on a MacBook Air
- How to Start PowerPoint: A Step-by-Step Guide for Beginners
- How to Set Time for Slides in Powerpoint
- How to End Powerpoint on Last Slide in Powerpoint 2010
- How to Change Line Spacing in Powerpoint for Every Slide at Once
- How to Put Embedded Youtube Video in Powerpoint 2010
- How to Make a Powerpoint Into a Video
- Can I Create a Timeline in Powerpoint?
- How to Check Word Count on Powerpoint 2010
- How to Add Page Numbers in Powerpoint 2010
How to Make a Microsoft PowerPoint Presentation Read-only

Sharing a PowerPoint presentation with others is common practice in business settings. However, you may not want recipients to edit or change your carefully crafted presentation. Making a PowerPoint presentation read-only prevents unauthorized changes while still allowing viewers to see the content.
There are a few simple ways to make a PowerPoint presentation read-only, both built into PowerPoint itself and using other Microsoft services. Read on to learn how to lock down your presentation and protect it from unwanted alterations.
Mark the Presentation as Final in PowerPoint
The easiest way to make a PowerPoint presentation read-only is to mark it as final right within PowerPoint. Here are the steps:
- Open the PowerPoint presentation you want to make read-only.
- Click on the “File” tab.
- Select “Info” on the left side of the menu.
- Click on “Protect Presentation” and choose “Mark as Final” from the drop-down menu.
Marking a presentation as final sets it to read-only mode within PowerPoint. Other users will be able to view the presentation but will be prevented from making changes.
There is also an option to select “Always Open Read-Only” which prompts users to actively choose to edit the presentation rather than opening it in editing mode by default.
The main downside of this method is users can still override the read-only status by clicking “Edit Anyway.” So it discourages edits but does not completely prevent them.
Set File Permissions in SharePoint or OneDrive
If you store your PowerPoint presentation in SharePoint or OneDrive, you can restrict editing permissions through those platforms. Here’s how:
- Upload or save your PowerPoint file to OneDrive or a SharePoint document library.
- Right click on the file and select “Manage Access.”
- For each person you share with, change their access from “Can Edit” to “Can View.”
With editing rights revoked at the platform level, users will only be able to view or download the presentation in SharePoint or OneDrive. To enable co-authoring abilities again, you can restore edit access.
Save as PDF
Another way to effectively make a PowerPoint presentation read-only is to export or save it as a PDF. PDF files are inherently non-editable documents.
Simply open your presentation in PowerPoint and select “File > Export > Create PDF/XPS.” The presentation will save as a PDF, after which you can share or distribute the new non-editable version.
If you want recipients to still be able to view the PowerPoint and its animations/transitions, you can also save it as a PowerPoint Show (.ppsx) from the “Save As” menu. This format runs the slideshow without the editing interface.
Set a Read-Only File Attribute
For Windows users, you can make a PowerPoint presentation read-only by adjusting file attributes rather than relying on PowerPoint settings.
- Locate your PowerPoint file in File Explorer.
- Right click, select “Properties”, and click the Attributes tab.
- Check the box next to “Read-only.”
- Click “OK” to save the changes.
Now Windows will treat the file as read-only system-wide, blocking any program from opening it in an editable mode. You can repeat these steps to remove the read-only status later on.
Use DRM Software
If you need to share presentations with highly sensitive information, consider using digital rights management (DRM) software. DRM tools like Microsoft Azure Rights Management let you encrypt files, set detailed usage permissions, and revoke access remotely.
While the methods above discourage or hinder editing, DRM solutions like Microsoft’s provide complete protection of intellectual property. Explore enterprise-grade DRM tools if unauthorized changes to a shared presentation could cause harm.
Preventing unintended modifications to a PowerPoint presentation ensures your original version remains intact. The techniques covered in this article, from marking as final to adjusting file attributes, make it simple to keep your presentation read-only and guarded from unwanted changes.
Choose the read-only method that aligns with your use case, whether it’s quick sharing inside your organization or distributing sensitive materials with partners. Just remember edits can still happen if recipients override some read-only settings within PowerPoint itself. For true restrictions, rely on platform permissions, file formats like PDF, or robust DRM systems.
About The Author
Vegaslide staff, related posts.

How to Narrate a PowerPoint on Mac

How to Make a YouTube Video with PowerPoint

How to Make a Flowchart in PowerPoint

How to Duplicate a Slide in PowerPoint 2010

How to Make a Copy of a Microsoft PowerPoint? (The Easy Way)
Microsoft PowerPoint is a popular presentation software used by millions of people around the world.
But do you know how to make a copy of a Microsoft PowerPoint presentation? Making a copy of a PowerPoint presentation can be extremely useful, allowing you to keep a backup of your work and access multiple versions.
In this article, we’ll cover the benefits of making a copy of a PowerPoint presentation, a step-by-step guide to making a copy, tips for doing it successfully, how to access the copy, and different ways to store and access multiple versions.
We’ll also discuss some common mistakes to avoid when making a copy of a PowerPoint presentation.
So if you want to learn how to make a copy of a Microsoft PowerPoint presentation the easy way, read on!
Table of Contents
Short Answer
To make a copy of a Microsoft PowerPoint presentation, open the file in PowerPoint and select “File” from the top menu.
Then choose “Save As” and enter a new filename for the copy.
This will create a duplicate file that you can make changes to without affecting the original presentation.
You can also right-click on the file in the File Explorer and select “Copy” or “Duplicate” to create a copy of the PowerPoint file.
What is a PowerPoint Presentation?
A PowerPoint presentation is a digital presentation created in Microsoft office using the PowerPoint program.
It is composed of a series of slides, which can include text, images, graphics, animations, and audio.
PowerPoint presentations are often used for educational purposes, business meetings, and other professional purposes, such as sales pitches and product launches.
PowerPoint is an effective way to communicate a message or idea in an engaging and visual way, and can be a great tool for delivering presentations in a variety of settings.
Benefits of Making a Copy of a PowerPoint Presentation
Making a copy of a Microsoft PowerPoint presentation can be a great way to store and organize your slides.
By creating a copy of your presentation, you can have multiple versions of the same presentation that you can easily access and edit.
This can be especially useful when making changes to your presentation or when you need to keep track of different versions of the same presentation.
Creating a copy of a presentation can also help you keep your original presentation intact.
When making changes to a presentation, it can be easy to accidentally delete slides or make unwanted modifications.
By creating a copy of your presentation, you can easily revert back to the original version if needed.
Having multiple copies of a presentation can also help you keep track of different versions of the presentation.
For example, if you are creating a presentation for a client, you may want to create a copy for each version of the presentation you create.
This will help you keep track of the changes you make and easily access the version you need.
Finally, creating a copy of your presentation can be a great way to share your presentation with others.
By making a copy of your presentation, you can easily share it with colleagues, friends, and family.
This can be especially useful if you need to collaborate on a presentation or send it to someone for review.
Step-by-Step Guide to Making a Copy of a PowerPoint Presentation
Making a copy of a Microsoft PowerPoint presentation is an easy way to store and organize all of your slides.
To get started, open the presentation you want to copy.
Once youve opened the file, go to the File tab on the ribbon.
When you select the File tab, a menu will appear with a variety of options.
From this menu, select Save As.
Once youve clicked Save As, youll be prompted to select a location to save the copy.
Make sure to choose a location that is easily accessible.
Once youve selected a location, the copy will be saved as a PowerPoint file.
This file can be edited and used to create a new presentation.
Using this method, you can easily store and access multiple versions of the same presentation.
Not only can you save a copy of the presentation, but you can also create additional copies and save them in different locations.
This way, youll have a backup of the presentation in case something happens to the original.
Making a copy of a PowerPoint presentation is a great way to keep your slides organized and accessible.
With this simple method, you can easily have multiple versions of the same presentation available at any time.
Tips for Making a Copy of a PowerPoint Presentation
Creating a copy of a Microsoft PowerPoint presentation is an easy and efficient way to store and organize slides. It can be helpful to have multiple versions of a presentation on hand, and making a copy is an easy way to do that. Here are some tips to make the process even simpler:
1. Open the presentation you want to copy. Before you make a copy, make sure youve opened the presentation you want to copy. This will ensure that the copy you make is accurate and up-to-date.
2. Go to the File tab on the ribbon. Once the presentation is open, go to the File tab on the ribbon. This tab is located at the top of the window and contains all the options you need for saving and sharing your presentation.
3. Select Save As. Once youve opened the File tab, select the Save As option. This will open a window where you can choose a location to save the copy.
4. Choose a location to save the copy. Once youve selected the Save As option, you can choose a location to save the copy. Consider saving the copy to a location thats easy to find, such as a dedicated folder or your desktop.
5. The copy will be saved as a PowerPoint file. After youve chosen a location to save the copy, the copy will be saved as a PowerPoint file. This means that you can open it and edit it like any other PowerPoint presentation.
By following these simple steps, you can quickly and easily make a copy of your PowerPoint presentation.
This can be a great way to store and access multiple versions of the same presentation.
Plus, if you ever need to go back to a version of the presentation you had before, you can easily access the copy you made.
How to Access the Copy of the PowerPoint Presentation
Creating a copy of a Microsoft PowerPoint presentation is a quick and easy process, and it can be a great way to store and organize your slides.
To make a copy of a PowerPoint presentation, you first need to open the presentation you want to copy.
Once you have the presentation open, go to the File tab on the ribbon at the top of the window.
From the File tab, select the “Save As” option.
This will open a window where you can choose a location to save the copy.
Select the folder you would like to save the copy in and click “Save”.
The copy will be saved as a PowerPoint file that can be edited and used to create a new presentation.
With this method, you can easily store and access multiple versions of the same presentation.
If you want to open the copy of the PowerPoint presentation you just created, simply navigate to the folder where you saved it and open the file.
You can also access the copy from the PowerPoint “Recent” tab.
This tab will show the most recent presentations you have opened, including the copy of the presentation.
You can open the copy from the Recent tab by simply selecting the file and clicking “Open”.
Additionally, if you have saved the copy to “OneDrive” or “Sharepoint” you can access the copy from those locations as well.
By creating a copy of your PowerPoint presentation, you can easily store and access multiple versions of the same presentation.
This can be especially useful if you are working on a presentation with multiple people and you need to be able to access different versions of the presentation.
With the ability to quickly and easily create a copy of your presentation, you can ensure that you are always working with the most up-to-date version.
Different Ways to Store and Access Multiple Versions of the PowerPoint Presentation
Creating a copy of a Microsoft PowerPoint presentation is an effective way to store and access multiple versions of the same presentation.
With this method, you can easily keep track of changes and edits made to the presentation over time.
It can also be a great way to organize your slides and keep them organized.
There are a few different ways to make a copy of a PowerPoint presentation.
The most common method is to open the presentation you want to copy, go to the File tab on the ribbon, select Save As, and then choose a location to save the copy.
This is the easiest and most straightforward method, but it does require that you have the original presentation open in order to make a copy of it.
Another method of creating a copy of a PowerPoint presentation is to export the file to a different format.
This can be done by going to the File tab on the ribbon, selecting Export, and then selecting the format you would like to export the file to.
This can be useful if you want to share the presentation with someone who does not have PowerPoint installed.
Finally, you can also create a copy of a PowerPoint presentation by downloading the file from a website or cloud storage service.
This is a great option if you need to share the presentation with someone who does not have access to the original file.
Once you have downloaded the file, you can then open it in PowerPoint and make a copy of it.
No matter which method you choose, making a copy of a PowerPoint presentation is a great way to store and access multiple versions of the same presentation.
By using any of these methods, you can easily keep track of changes and edits made to the presentation over time.
Common Mistakes to Avoid When Making a Copy of a PowerPoint Presentation
Making a copy of a Microsoft PowerPoint presentation is a simple task, but there are some potential pitfalls to avoid. To ensure you make a successful copy, here are some common mistakes to avoid:
1. Not Saving the Copy in the Right Location: When making a copy of a PowerPoint presentation, you must make sure to save the copy in the right location. If youre saving the copy to your computer, make sure youre saving it to the right folder, as it can be difficult to find the copy if you save it in the wrong place. If youre saving the copy online, make sure youre saving it to the right cloud storage service.
2. Not Naming the Copy Correctly: When saving the copy, make sure you name it properly. Otherwise, it can be difficult to tell the difference between the original presentation and the copy. Its a good idea to include the date in the name of the copy, as this will help you keep track of which version of the presentation is the most recent.
3. Not Editing the Copy: When making a copy of a PowerPoint presentation, make sure you edit the copy to make sure its different from the original. If you simply make a copy and dont make any changes, then the original and the copy will be identical, and you wont be able to tell the difference.
By avoiding these common mistakes, youll be able to make a successful copy of a PowerPoint presentation and store multiple versions of your presentation in an organized manner.
Final Thoughts
Making a copy of a Microsoft PowerPoint presentation is a simple and effective way to store and organize slides and create multiple versions of the same presentation.
With this guide, you now have the step-by-step instructions to make a copy, access the copy, and store multiple versions of the presentation.
So, go ahead and give it a try today and make sure to keep your presentations organized and up-to-date.
James Wilson
James Wilson has extensive knowledge in the information technology industry.His second love, besides dealing with computers, is smart home technology. He is continually updating information to better comprehend this problem and has a deep understanding of the apartment’s support system.
Recent Posts
Is Airtable a Public Company? Unveiling the Truth
No, Airtable is not a public company. As of now, Airtable is a private company that has raised funds from various investors but has not gone through an initial public offering (IPO) to be listed on...
How to Make Money with Airtable: Top Strategies and Success Stories
To make money with Airtable, you can offer consulting services to businesses looking to optimize their workflows through the platform. You can also create and sell templates or automation scripts...
Passper Online
Unlock all file formats online
Passper for Excel
Excel password remover
Passper for Word
Word password remover
Passper for PowerPoint
Powerpoint password remover
Passper for PDF
PDF password remover
Passper for RAR
Rar password unlocker
Passper for ZIP
Zip password unlocker
- Windows Password Recovery
Top 5 Methods to Make PowerPoint Read Only
There are a lot of reasons why you would want to make a PowerPoint document read-only. But perhaps the most important one is to keep someone else from making changes on the document. PowerPoint presentations are often sensitive and just a small change can cause the whole presentation to lose meaning. Therefore, it would make sense to make the document read-only as soon as it is done to prevent accidental changes that can alter the whole concept of the presentation. You may also want to protect the content of the presentation and the easiest way to do that would be to make it harder to edit the presentation.
Whatever your reasons for making your PowerPoint presentation read-only, this article will share with you numerous ways you can do that. We will also take the time to share with you the easiest way to unlock a read-only PowerPoint presentation.
Part 1. How to Make PowerPoint Read Only
The following are just some of the ways you can make a PowerPoint presentation read only.
1. Set Presentations to Read Only
2. set password to modify presentation, 3. burn powerpoint to cd/dvd, 4. convert powerpoint to read-only video, 5. set restrict access.
One of the easiest ways to make your presentation read only is to mark it as "Final". This is a feature available in MS Office that is used to let other users know that you have completed all edits on the document. Here's how to do it;
Step 1: Open the document you want to protect and then click on "File".
Step 2: Click on "Info" and then select "Protect Presentation". Step 3: In the options on the drop-down menu, click on "Mark as Final".

Step 4: Click "OK" in the dialogue box that appears and click "OK" again to confirm.
The next time you open the document, you will see a yellow "Marked as Final" message at the top. If you want to edit the document, simply click on "Edit Anyway" to restore your editing privileges.

You can also choose to set a password to restrict modification of the document. Here's how to do that;
Step 1: Open the presentation and then click on "File > Save As".
Step 2: Click on "Tools" at the bottom of the "Save As" dialogue box and then click on "General Options".
Step 3: In the box marked "Password to Modify", type in the password you would like to use and then click "OK". Reenter the password and then click "OK".

Step 4: Click "Save" to save the PowerPoint presentation and the next time someone tries to edit the document, they will be required to enter the password.
Another really easy way to make a PowerPoint not read only is to burn the file onto CD/DVD. There are a lot of programs that can help you do that and since storage media like CD/DVD is read-only, you are assured of the safety of the data on the presentation. It is also much easier to playback the presentation when it is on CD/DVD.

In the same way, you can also convert your PowerPoint presentation into read-only video. This will not just make it impossible for others to edit the content on the presentation, but it will also make it easier to distribute the presentation.
There are a lot of tools that can help you convert the PowerPoint presentation to video, including screen recorders like Adobe Captivate and Camtasia Studio or Quick Time Movie and Windows Movie Maker.

You may also be able to prevent others from editing the presentation if you use the "Restrict Access" option. The following is how to do that;
Step 1: Open the document and then click on "File".
Step 2: Click on "Info > Protect Document" and from then choose "Restrict Access" from the dropdown menu.

This option will allow people to open and read the document but they will be unable to print, edit or copy any of the content on the presentation.
Part 2. How to Unlock a Read Only PowerPoint
What if you find yourself unable to edit a read only PowerPoint presentation? If someone has sent you an incomplete presentation that has restrictions, the best way to lift these restrictions and edit the document is to use Passper for PowerPoint . This is a password recovery tool that makes it very easy for you to unlock any presentation and lift any restrictions placed on the document. The following are some of the program's features;
Check 2,900,000 passwords /S: It has one of the fastest password recovery rates in the market because it can check up to 2,900,000 passwords per second.
4 Attack Modes Available: 4 different attack modes are used to make it easier to recover the password in the shortest time possible. The fact that it has a database of millions of frequently used passwords is just an added bonus.
Remove Edit Restrictions: It can remove any editing restrictions on the presentation within 2 seconds in a single click.
It is compatible with all versions of MS Office and 100% safe to use. None of the data on the program will be lost or damaged in any way during the recovery process.
Free Download Buy Now
Follow these simple steps to use Passper for PowerPoint to unlock a read-only presentation.
Step 1: Download and install Passper for PowerPoint on your computer and then launch the program. In the main window, click on "Remove Restrictions".

Step 2: Import the presentation into the program and then click on "Remove".

In a few seconds all editing restrictions will be lifted from the document, allowing you to edit the presentation any way you want.
How to Recover PowerPoint Presentation if You Can't Open the File
If you are unable to open the presentation because it is password protected and you don't have the password, Passper for PowerPoint can also help you easily recover the password and use it to open the presentation. Here's how to do that;
Step 1: Open Passper for PowerPoint and choose "Recover Passwords" in the main window.

Step 2: Add the protected presentation into the program and then select a recovery method to use. Click "Recover".

Step 3: The program will immediately begin the process of recovering the password. When the process is complete, the password will be displayed on the screen. You can use it to unlock the document.

Make PowerPoint read only is a simple, yet highly effective technique to help you prevent accidental edits on your presentation and also keep the content safe. But sometimes this well-meaning feature can keep you locked out of your own document. If you find yourself unable to access the PowerPoint presentation or unable to edit it, Passper for PowerPoint presents the best solution to help you recover the password or lift restrictions thanks to its faster recovery speeds, more attack methods and higher recovery rates.
Related Articles:
- Top 9 PowerPoint Password Recovery Software That Unlock Your PowerPoint
- 6 Free Ways to Lock PowerPoint from Editing
- [Updated] 4 Methods to Unlock Read-Only PowerPoint

By Ronnie Barnes to PowerPoint
Posted on Mar 17, 2023 ( Updated: Mar 17, 2023)
Ronnie Barnes, a blogger with more than 5-year experience in writing tips about password recovery for Windows and office files.
How to video record yourself presenting a PowerPoint

What type of content do you primarily create?
Recording yourself presenting a PowerPoint can be challenging, especially getting the technical aspects right. You need to capture your screen, webcam, and audio seamlessly while delivering your content naturally and avoiding awkward transitions between slides.
Finding a tool that integrates all these components can seem daunting. However, recording yourself presenting a PowerPoint doesn't have to be reserved for the tech-savvy or professional speakers.
Whether you're a teacher creating online lessons, a marketer producing a product demo, or someone looking to improve their presentation skills, this guide will walk you through user-friendly tools and strategies that will teach you how to video record yourself presenting a PowerPoint.
- Recording yourself presenting a PowerPoint can be challenging, but it doesn't have to be reserved for experts.
- Video recording offers unlimited reach, repurposing opportunities, and a more engaging experience.
- Use PowerPoint's built-in recording feature or tools like Descript for a polished presentation.
- Other tools like Zoom, Loom, OBS Studio, Clipchamp, and Quick Time Player can also be used for recording.
- Tips include practicing your script, using slide notes, ensuring high-quality audio and lighting, and incorporating storytelling techniques.
Why video record yourself presenting a PowerPoint?
Video recording your PowerPoint presentations offers several advantages:
- Unlimited reach : Unlike in-person presentations confined to a specific time and location, recorded videos allow your message to reach audiences globally at their convenience.
- Repurposing opportunities: Recorded presentations can be repurposed as evergreen content across multiple platforms, such as social media, online courses, webinars, and internal training materials, maximizing their value.
- Personal and engaging : Recording yourself narrating a presentation adds a personal touch and dynamic element that static slides alone cannot replicate. Your viewers can see and hear you deliver the content, creating a more immersive and engaging experience.
How to record your presentation with the PowerPoint app
Built-in recording feature in powerpoint.
1. Open the PowerPoint slide you want to record.
2. Click on the Record tab of the top toolbar.
3. Click on the Record button and choose from any of the following options:
- From Current Slide
- From Beginning
4. You'll see the PowerPoint screen recording window.
5. Select the microphone and camera from the icon on the top-right.
6. Click the Stop and Replay buttons to end or replay your recording.
7. To export your presentation's recording, click Export to Video within the Recording tab.
Benefits : Easy to use, no external tools needed
Limitations : Limited editing capabilities.
How to make a more polished recording of your presentation with Descript
While PowerPoint's built-in recording features are helpful, they may not produce the refined result you want for your presentation. That's where Descript comes in handy.
It’s a whole production studio at your fingertips, with video recording, transcription, and editing capabilities, ready to transform dull PowerPoint slides into an engaging experience for your audience. Descript also has a built-in screen recorder.
You can use Descript on Windows, Mac, or even straight from your web browser.
Here's step-by-step guide to recording your PowerPoint presentation with Descript.
Set up your screen recording
1. Install and open Descript. At the top of the editor, click and open the Record panel.
2. Select Screen.
3. Set Recorder settings:
Adjust the default recording settings to your liking, including the transcription language, the maximum recording resolution, and more.
4. Set recording options. Choose which audio and video sources to record (e.g., microphone, computer audio, camera). Remember to turn the camera on to capture your talking head video alongside your PowerPoint presentation.
5. Click the Additional Settings icon for
- Studio Sound (Optional): Enhance audio quality with noise reduction and background removal
- Transcription (Optional): Enable automatic transcription for easier editing
- Recording separate audio tracks
6. Add (optional) Speaker labels for each audio track (e.g., "Narrator," "Expert") by typing them in the text box next to your audio inputs.
Capture your screen recording
1. Select the right recording option:
- Recording into script : Choose this if you haven’t recorded anything yet.
- Replace selection : Choose this if you already have a script and want to replace a specific section with a new recording.
- Record new layer : Pick this for recording your video as a new layer on top of an existing recording.
2. Click Record at the bottom of the Record panel.
3. Drag over the area of your screen you wish to record. Click Start Recording. Press Space to start recording the full screen.
4. Click Stop to finish recording
Bonus: Descript creates separate tracks for camera, microphone, and computer audio. You can edit each track individually for more precise control.
- Do a short test recording to ensure everything is set up correctly.
- Set your recording to transibe for easier editing.
Editing and polishing your PowerPoint recording in Descript
Descript's AI video editing tool makes it a breeze to trim, cut, and splice your video footage, ensuring a seamless flow from start to finish. You can add smooth transitions and other visual effects to make your presentation pop.
Here’s a glimpse of how to edit and polish your PowerPoint recording in Descript:
Edit your recording like a doc
Did you make a mistake during a slide transition? No problem. Just delete those sections in the text transcript (created automatically by Descript) and the video will adjust to match.
Remove filler words
Sound smoother and more confident by easily removing filler words like "um" and "uh" from the transcript.
Fix voiceover mistakes by typing
Didn't nail your delivery on a specific slide? No need to start from scratch! Descript's Overdub feature lets you simply type in the correct narration and replace the audio on that slide with AI voice cloning.
Boost video quality and engagement :
- Crisp up audio quality by reducing background noise and room reverb with the AI-powered Studio Sound feature.
- Replace your background completely with the Green Screen Video Editor —look like you're presenting in a sleek studio or broadcasting from a beach.
- Enable Eye Contact simulation with AI, so it appears you're making direct eye contact with viewers, even if you’re looking or reading something off-camera.
Other ways to video record yourself presenting a PowerPoint
Use Zoom’s meeting recording feature to record yourself giving a PowerPoint presentation. Start a Zoom meeting with yourself, share your PowerPoint window, and enable recording
Loom is a handy screen recording tool that also offers a webcam overlay. Launch the Loom app or Chrome extension and set it to record your screen and webcam. Expect high-quality recordings but no advanced editing features. The free plan offers only five minutes of recording at a stretch.
3. OBS Studio
OBS Studio is a free, open-source screen recorder/streaming software with a steeper learning curve. It’s popular among advanced or tech-savvy users who need granular customization and control.
To record your presentation, add a "Screen Capture" source to capture your PowerPoint window and a "Video Capture Device" source for your webcam.
4. Clipchamp: Recording natively in Windows
You can use Microsoft’s Clipchamp , the built-in screen recorder and video editor for Windows, to simultaneously capture your computer screen, webcam, and audio for recording your PowerPoint presentation. It’s also available as a browser-based app. You can record up to 30 minutes on screen and webcam recordings.
Users can also adjust the screen and webcam recordings in the editing timeline separately.
5. Quick Time Player Recording natively in Mac
Use Mac’s Quick Time Player to record your PowerPoint presentation. It’s not as straightforward as the other options on this list, so here’s a quick guide to help you out:
- Launch Quick Time Player.
- Select File and go to New Movie Recording.
- You'll be recording your entire screen in addition to recording your face, so adjust the size and location of the recording window so that it's in a nonintrusive corner of your PowerPoint.
- Go to View and select Float on Top .
- Next, go to File and select New Screen Recording.
- On the menu that appears, select Record Selected Portion and drag a border around your PowerPoint and the webcam recording window.
- Press Record and start presenting.
- You can adjust the video quality and the audio source in the webcam recording window.
How to turn your PowerPoint presentation slides into a video
Did you know PowerPoint lets you save your presentation as a video, too?
Here's a breakdown of the two ways you can do so—keeping all the presentation elements (narration, animation, pointer movements, timings, and so on) intact in the presentation itself.
Save your PowerPoint presentation as a video
This creates a separate video file (MP4 or WMV) that anyone can play, even without PowerPoint.
Follow these steps:
- Save your presentation
- Go to File > Export > Create a Video
- Ultra HD (4K): Best for large screens (if you have Windows 10+)
- Full HD (1080p): Great for computers and TVs
- HD (720p): Good for streaming online or on DVDs
- Standard (480p): Smallest size, good for phones
4. Decide on narration
- If you haven't recorded yourself talking, choose "Don't Use Recorded Timings and Narrations" from the dropdown menu
- If you have a recording, choose "Use Recorded Timings and Narrations." You can also set how long each slide shows for (default is 5 seconds)
5. Click Create Video
6. Name your video, pick a folder to save it in, and choose a file type (MPEG-4 or Windows Media Video)
Creating the video might take a while, especially for longer presentations. You can even leave it running overnight. Once done, find your video in the chosen folder and double-click to play it.
Save your PowerPoint presentation as a slideshow
This saves your presentation as a special file (PPSX) that starts playing automatically on full screen when opened. It only works with PowerPoint.
Here’s how it works:
- Make sure your presentation is saved (regular PowerPoint file)
- Go to File > Save As .
- Pick a folder to save the slideshow in.
- Under Save as type, choose PowerPoint Show (*.ppsx) .
- Click Save .
Now when someone opens the file, it will automatically play the slideshow.
Pro tips for making better video PowerPoint presentations
Practice your script.
Recording a flawless PowerPoint video rarely happens in one take. The key is practice.
Record practice run-throughs and watch them back. Make notes on areas that need improvement or parts lacking clarity. The more you drill your script, the more confident and natural you'll sound in the final recording.
Take advantage of PowerPoint's built-in Speaker Coach . The feature shows you whether your pace is too fast or slow, your use of filler words like "um," and suggestions to improve your voice modulation.
Use slide notes for coherent delivery
Wouldn’t a personal teleprompter make presentations so much easier? That’s what slide notes are for.
Having your thoughts and talking points organized within your PowerPoint file lets you have all crucial information and prompts readily available when recording.
Go ahead and add detailed notes or even a full script for each slide. This will help you stay on track and provide a handy transcript reference if you need to do any editing or voiceover work in post-production.
Use high-quality audio equipment or turn on Studio Sound
Poor audio recording quality is a surefire way to make even the most visually polished video feel amateurish. Do your presentation justice by investing in a decent external or Bluetooth microphone and audio interface to capture clear voiceover audio.
If you must use a built-in mic, record in a quiet environment to minimize background noise pickup. Or better yet, pair up with an AI-powered audio enhancement tool like Descript's Studio Sound , which reduces background noise , reverb, and other artifacts.
Ensure a clean background and even lighting
Ditch cluttered backgrounds. You want people to focus on the content of your PowerPoint and not be distracted by the funny shapes and colors in your video.
Your video lighting and framing matters, too. Position yourself facing a natural light source or bring supplemental video lighting to eliminate weird shadows and squinting-level glare.
Look directly into the camera or turn on Eye Contact
Looking directly into the camera is essential to create a sense of connection with the audience. Position your webcam or camera at eye level and imagine you're talking to a friend. If you're using Descript, enable the Eye Contact feature to auto-adjust your gaze towards the camera.
- Dress professionally and maintain a good posture to project confidence and authority.
- Use visuals, animations, and multimedia elements to enhance your presentation and keep your audience engaged.
- Consider adding closed captions or subtitles to your video for better accessibility and engagement, especially for those watching without sound.
- Speak clearly and at a moderate pace, using vocal variety to emphasize key points and maintain interest.
- Incorporate storytelling techniques, real-life examples, or personal anecdotes to make your video presentation more relatable and memorable .
Take your PowerPoint presentations from amateur to amazing
Recording yourself virtually presenting a PowerPoint allows you to distribute your message using the most engaging type of content: video. And there are many screen recording tools out there that can capture your screen and web camera footage with just a few clicks.
But how do you stand out?
By focusing on the presentation's depth, your delivery, and the video's quality. The first two are the bare minimum to communicate your message effectively.
But the right screen capture software and all-in-one video creation tool like Descript can help you with third. Use the tool to improve the quality of your recorded PPT presentations.
With Descript, it's easier than ever to record your screen, polish up the audio, and create stunning visuals all in one place. So why wait?
Sign up for Descript today and simplify your workflow while creating a PowerPoint presentation video that sticks with your audience in the long term.
How do you make a presentation video with your face?
To create a presentation video with your face, follow these steps:
- Open your presentation in PowerPoint.
- Go to the Slide Show tab.
- Click on Record and choose From Current Slide or From Beginning .
- Choose your microphone and camera by clicking on a sound icon on the top-right.
- Start recording by clicking on the record button.
- Speak into your microphone to narrate the presentation.
- Your webcam will capture your face during the recording.
- Click Stop when you finish recording.
- Export your recorded presentation by clicking on File> Export>Create a video.
How do you present yourself in PowerPoint?
To present yourself effectively in PowerPoint, follow these steps:
- Determine the key information to include in your presentation.
- Design and prepare your PowerPoint slides with a cohesive theme.
- Craft a compelling introduction to engage your audience.
- Tailor your presentation to different time constraints for flexibility.
- Capture the audience's attention before you begin speaking.
Related articles

Featured articles:
10 excellent Loom alternatives to record your screen
Looking for the best ways to record your screen without Loom? Find out 10 Loom alternatives, their features, and pricing.

How to record a YouTube video: A guide for all devices
If you want to record a YouTube video for personal use or fair-use repurposing, here are the steps to get started.

For Business
Social media video marketing: Everything you need to know
Learn how to win over potential customers (and the algorithms) with the right social media video marketing tools, strategy, and optimizations.

How to record a podcast on Zoom: A beginner’s guide
Follow this step-by-step guide on how to record a podcast on Zoom, then learn about why it may not be your best recording option.

How to record a Microsoft Teams meeting: 5 easy ways
Learn how to record a Microsoft Teams meeting on any device and get answers to common problems.

10 effective how-to videos to engage your audience
How-to videos are a great way to educate your audience. Whether you’re recording a software demo or training instructions, here’s how to create a how-to video.

Articles you might find interesting
Make Your Pictures Come to Life and Create a Video
Videos made with your best pictures are a great way to show off memorable moments and to share those photos with your friends and family. Find out the best ways to create a video slideshow.

What is the rule of thirds? Meaning and examples in film
The rule of thirds is a guideline on how to position your subject in a film. Here’s how to use it to create stunning movies.

How to start a podcast on YouTube in 5 steps [2024]
This guide will walk you through the ins and outs of launching a podcast on YouTube. Whether you're a newbie or a veteran podcaster aiming to expand, we have all the information and insight you need.

Instagram stats 2023: Insights to enhance your marketing strategy in 2024
For content creators and marketers, understanding Instagram statistics is crucial for creating effective data-based strategies. By looking at statistics and trends, you can identify your audience’s preferences, narrow down the content formats that work best, and identify the ideal posting times that will generate the highest engagement.
.jpg)
Product Updates
New: Wistia integration for easier, better video marketing
It’s true that anybody with a smartphone can make and publish a video. But if you want that video to promote your business, it’s not so simple. Just shooting it and posting it on your social media accounts probably won’t accomplish much. If you’re going to invest the time and money, you probably want more from your video.

Descript vs. Riverside: Which is the best remote recording tool?
With a remote recording studio that checks all the boxes and a full-featured editor, Descript has built an all-in-one tool at a price that makes it the no-brainer choice for podcasters.
Join millions of creators who already have a head start.
Get free recording and editing tips, and resources delivered to your inbox.
Related articles:
Share this article

Contribute to the Microsoft 365 and Office forum! Click here to learn more 💡
April 9, 2024
Contribute to the Microsoft 365 and Office forum!
Click here to learn more 💡
PowerPoint Forum Top Contributors: Steve Rindsberg - John Korchok - Bob Jones AKA: CyberTaz ✅
May 10, 2024
PowerPoint Forum Top Contributors:
Steve Rindsberg - John Korchok - Bob Jones AKA: CyberTaz ✅
- Search the community and support articles
- Microsoft 365 and Office
- Search Community member
Ask a new question
Powerpoint Presentation Transcription
Using Office 365 connected to the web we can now 1) Dictate into power point slides (or into notes) 2) Get instantaneous transcriptions of PowerPoint presentations and translations of transcriptions but these transcriptions are not saved.
But is there a way to give your presentation to your audience, and have the transcription saved to the notes of each slide? Someone asked for this feature 12 years ago and there have been other requests. https://answers.microsoft.com/en-us/msoffice/forum/all/voice-transcription-for-powerpoint/9c0eb779-983c-4ec7-8f0d-bf9c5d104372 Tim
- Subscribe to RSS feed
Report abuse
Reported content has been submitted
Replies (4)
- Microsoft Agent |
Dear timtak1,
Good day. Thank you for posting to Microsoft Community.
I read your post and the link you provided carefully.
Thanks to the valuable feedback from each user, our team has been able to continuously improve the functionality of the products. At present, we have achieved real-time transcription function on PowerPoint, but we don’t have a function that can save transcription to the notes.
I sincerely recommend that you can share your feedback advice to our PowerPoint Feedback Community: PowerPoint · Community (microsoft.com) . Our Product Team is in-charge of the site, and they are constantly checking the comments and feedback from our customers. Many features have been developed and improved based on users' comments.
Let me know if you any question. Thank you for your patience and understanding.
Claire | Microsoft Community Moderator
Was this reply helpful? Yes No
Sorry this didn't help.
Great! Thanks for your feedback.
How satisfied are you with this reply?
Thanks for your feedback, it helps us improve the site.
Thanks for your feedback.
Dear Claire That's a shame. Gemini AI told me that a "live presentation" (I am not sure what that is) would save the transcript.
I hope that you do not close this thread until the issue is resolved.
Dear timtak1,
Thank you for posting back. I’m sorry above can’t assist you.
I searched the Live Presentation you mentioned, and I find an Official document introduced this function. But it is only supported on Microsoft Edge version 80+, Google Chrome version 72+, Mozilla Firefox version 68+, or Opera version 60+ on Windows or Mac.
More details please refer: Present Live: Engage your audience with Live Presentations - Microsoft Support
Thank you for your effort and time.
Dear Claire
Thank for your response.
There is no mention of the possibility of receiving a transcript.
I think that Gemini AI has got this wrong.
Also when I attempt to sign into Microsoft online and click on one of my presentations, I am shown a "Pick and Account" message which when I pick an account (there is only one shown) says We Couldn't Sign you In (on Firefox, latest and Edge latest).
But I could sign in on Chrome! The subtitles are displayed but there does not seem to be any option to save the subtitles and they do not appear to have been sent to me. Does anyone know differently?
Question Info
- For education
- Norsk Bokmål
- Ελληνικά
- Русский
- עברית
- العربية
- ไทย
- 한국어
- 中文(简体)
- 中文(繁體)
- 日本語
Make a presentation read-only in PowerPoint for the web
When you want to share your presentation with others but you don’t want them to change it, you can make it read-only. Here’s how using OneDrive and OneDrive for work or school:
Using OneDrive

Under Share , click Get a link .

Under View only , click Create .

Tip: Click Shorten to decrease the length of the URL that you share with others.
Right-click the URL and click Copy .

Under Share , click Send email .
Enter the email address in the To box.
Paste the URL in the message box, and click Share .
Click Close .
Using OneDrive for work or school
Under Invite People , type the names or email addresses of the people you want to view the presentation, and type a message.
Click the down arrow next to Can edit , and click Can view .

Click Share .
Note: The people you share the presentation with will receive an email invitation to view it.

Need more help?
Want more options.
Explore subscription benefits, browse training courses, learn how to secure your device, and more.

Microsoft 365 subscription benefits

Microsoft 365 training

Microsoft security

Accessibility center
Communities help you ask and answer questions, give feedback, and hear from experts with rich knowledge.

Ask the Microsoft Community

Microsoft Tech Community

Windows Insiders
Microsoft 365 Insiders
Was this information helpful?
Thank you for your feedback.
IMAGES
VIDEO
COMMENTS
First, open the read-only presentation and select the "File" tab. You'll be moved in the "Info" menu. Here, you'll see the "Protect Presentation" option is marked in yellow and has a message displayed next to it---the presentation has been marked as final to discourage any editing. Go ahead and select "Protect Presentation."
PowerPoint for the web. If you want to reuse some of the slides in a read-only presentation, you can download a copy to your computer and make changes to the copy. On the File tab, click Save As. Click Download. Pick the steps below for your browser to save and open the file.
Open the desired PowerPoint presentation, and click on the " File " tab. Next, click on the " Info " tab from the options presented on the left part of the screen. Select the " Protect Presentation " option. From the dropdown, select " Always Open Read-Only ". Finally, save the file by pressing Ctrl+S.
You can unlock a read-only PowerPoint presentation by removing the "Mark as Final" from the file. Step 1: Open the restricted PowerPoint presentation and then click "File". Step 2: Click on "Info" on the left and then select "Mark as final" on the drop-down menu under "Protect Presentation". Step 3: Now, the presentation is editable.
2. Click the File tab. You'll see this in the editing ribbon above the document space with Animations and Home . 3. Click Protect Presentation. You'll see this with an icon of a lock to the right of the Info menu. A menu will drop down from the lock icon. 4. Click Mark as Final.
4] Select Always Open Read-Only. In order to set your presentation to Read-Only, you must click on Always Open Read-Only from the dropdown menu, and right away, the changes will take effect. Now ...
3. Click "Protect Presentation" and select "Mark as Final." This acts as a toggle selection. If the presentation was read-only, it will now be editable, and if it was not protected, the Mark as ...
To make a PowerPoint Presentation read-only: Open your Powerpoint presentation. Choose File at the top left. Select Info on the bar on the left. Click Protect Presentation. In the pull-down menu ...
To save a copy of a PowerPoint presentation on your desktop, follow the 3 simple steps. Step-1: Click on the "File" tab. The first step is to click on the "File" tab. It is located on the left corner of the menu ribbon at the top of the screen. This will open the "File" menu. Step-2: Click on the "Save A Copy" option.
However, if you do that, you cannot do any of the following actions: 1. Save As a new file. 2. Copy any of the text in the PowerPoint into another document. This does not seem to be the way of an Excel or Word document that has been opened read only. The Save As and copy functionality are maintained in these programs even when the file is ...
PowerPoint for the web. If you want to reuse some of the slides in a read-only presentation, you can download a copy to your computer and make changes to the copy. On the File tab, click Save As. Click Download. Pick the steps below for your browser to save and open the file.
Step 2: Save the Presentation with a New Name. Go to 'File' > 'Save As' and choose a new name and location for your copied presentation. Saving the original presentation with a new name creates a separate file, allowing you to maintain the original while working on the new copy.
Here are the steps: Open the PowerPoint presentation you want to make read-only. Click on the "File" tab. Select "Info" on the left side of the menu. Click on "Protect Presentation" and choose "Mark as Final" from the drop-down menu. Marking a presentation as final sets it to read-only mode within PowerPoint.
In PowerPoint for the web, click the Share tab. Under Share, click Get a link. Under View only, click Create. Tip: Click Shorten to decrease the length of the URL that you share with others. Right-click the URL and click Copy. Under Share, click Send email. Enter the email address in the To box. Paste the URL in the message box, and click Share.
To get started, open the presentation you want to copy. Once youve opened the file, go to the File tab on the ribbon. When you select the File tab, a menu will appear with a variety of options. From this menu, select Save As. Once youve clicked Save As, youll be prompted to select a location to save the copy.
Follow these simple steps to use Passper for PowerPoint to unlock a read-only presentation. Step 1: Download and install Passper for PowerPoint on your computer and then launch the program. In the main window, click on "Remove Restrictions". Step 2: Import the presentation into the program and then click on "Remove".
PowerPoint for the web. If you want to reuse some of the slides in a read-only presentation, you can download a copy to your computer and make changes to the copy. On the File tab, click Save As. Click Download. Pick the steps below for your browser to save and open the file.
Record new layer: Pick this for recording your video as a new layer on top of an existing recording. 2. Click Record at the bottom of the Record panel. 3. Drag over the area of your screen you wish to record. Click Start Recording. Press Space to start recording the full screen. 4. Click Stop to finish recording.
I read your post and the link you provided carefully. Thanks to the valuable feedback from each user, our team has been able to continuously improve the functionality of the products. At present, we have achieved real-time transcription function on PowerPoint, but we don't have a function that can save transcription to the notes.
Local, state, and federal government websites often end in .gov. Commonwealth of Pennsylvania government websites and email systems use "pennsylvania.gov" or "pa.gov" at the end of the address.
In PowerPoint for the web, click the Share tab. Under Share, click Get a link. Under View only, click Create. Tip: Click Shorten to decrease the length of the URL that you share with others. Right-click the URL and click Copy. Under Share, click Send email. Enter the email address in the To box. Paste the URL in the message box, and click Share.
In PowerPoint for the web, click the Share tab. Under Share, click Get a link. Under View only, click Create. Tip: Click Shorten to decrease the length of the URL that you share with others. Right-click the URL and click Copy. Under Share, click Send email. Enter the email address in the To box. Paste the URL in the message box, and click Share.